介绍
此版本更新于 2020 年 8 月 24 日 deno @ 2600d5a

Deno 是一个 JavaScript/TypeScript 的运行时,默认使用安全环境执行代码,有着卓越的开发体验。
Deno 建立在 V8、Rust 和 Tokio 的基础上。
功能亮点
-
默认安全。外部代码没有文件系统、网络、环境的访问权限,除非显式开启。
-
支持开箱即用的 TypeScript 的环境。
-
只分发一个独立的可执行文件 (
deno)。 -
有着内建的工具箱,比如一个依赖信息查看器 (
deno info) 和一个代码格式化工具 (deno fmt)。 -
有一组经过审计的 标准模块,保证能在 Deno 上工作。
-
脚本代码能被打包为一个单独的 JavaScript 文件。
哲学
Deno 旨在为现代程序员提供高效、安全的脚本环境。
它将始终作为单个可执行文件分发,并且该可执行文件将能运行任何 Deno 程序。给定一个 Deno 程序的 URL,您应该能够用压缩后不超过 15 MB 的 Deno 可执行文件运行它。
Deno 明确地承担了运行时和包管理器的角色。它使用标准的浏览器兼容协议(URL)来加载模块。
对于过去用 bash 或 python 编写的工具脚本来说,Deno 是一个优秀的替代品。
目标
-
只分发一个独立的可执行文件 (
deno)。 -
默认安全。外部代码没有文件系统、网络、环境的访问权限,除非显式开启。
-
浏览器兼容:完全用 JavaScript 编写且不使用全局
Deno命名空间(或功能测试)的程序是 Deno 程序的子集,应该能够直接在现代浏览器中运行而无需更改。 -
提供内置工具来提升开发体验,比如单元测试、代码格式化、代码检查。
-
不把 V8 的概念泄露到用户空间。
-
能够高效地提供 HTTP 服务
与 Node.js 的比较
-
Deno 不使用
npm,而是使用 URL 或文件路径引用模块。 -
Deno 在模块解析算法中不使用
package.json。 -
Deno 中的所有异步操作返回 promise,因此 Deno 提供与 Node 不同的 API。
-
Deno 需要显式指定文件、网络和环境权限。
-
当未捕获的错误发生时,Deno 总是会异常退出。
-
使用 ES 模块,不支持
require()。第三方模块通过 URL 导入。import * as log from "https://deno.land/std@$STD_VERSION/log/mod.ts";
其他关键行为
-
远程代码在第一次运行时获取并缓存,直到代码通过
--reload选项运行。(所以它在飞机上也能工作) -
从远程 URL 加载的模块或文件应当是不可变且可缓存的。
入门
在本章节,我们将讨论;
- 安装 Deno
- 设置您的环境
- 运行一个
Hello World脚本 - 编写您自己的脚本
- 命令行界面
- 理解权限控制
- 在 Deno 中使用 TypeScript
- 在 Deno 中使用 WebAssembly
安装
Deno 能够在 macOS、Linux 和 Windows 上运行。Deno 是一个单独的可执行文件,它没有额外的依赖。
下载安装
deno_install 提供了方便的脚本,用以下载安装 Deno.
使用 Shell (macOS 和 Linux):
curl -fsSL https://deno.land/x/install/install.sh | sh
使用 PowerShell (Windows):
iwr https://deno.land/x/install/install.ps1 -useb | iex
使用 Scoop (Windows):
scoop install deno
使用 Chocolatey (Windows):
choco install deno
使用 Homebrew (macOS):
brew install deno
使用 Cargo (Windows, macOS, Linux):
cargo install deno
Deno 也可以手动安装,只需从 github.com/denoland/deno/releases 下载一个 zip 文件。它仅包含一个单独的可执行文件。在 macOS 和 Linux 上,您需要为它设置执行权限。
测试安装
运行 deno --version,如果它打印出 Deno 版本,说明安装成功。
运行 deno help 以查看帮助文档。
运行 deno help <subcommand> 以查看子命令的选项。
CLI 的详细指南在 这里。
升级
要升级已安装的版本,运行:
deno upgrade
这会从 github.com/denoland/deno/releases 获取最新的发布版本,然后解压并替换现有的版本。
您也可以用此来安装一个特定的版本:
deno upgrade --version 1.0.1
从源码构建
关于构建步骤的信息请查阅 贡献 章节。
设置您的环境
要高效地使用 Deno,您需要设置环境,比如命令行自动补全、环境变量、编辑器或 IDE。
环境变量
这是一些控制 Deno 行为的环境变量:
DENO_DIR 默认为 $HOME/.cache/deno,但可以设置为任何路径。这是 Deno 存放生成的代码和缓存的源码的路径。
如果 NO_COLOR 被设置,Deno 将会关闭彩色输出 (https://no-color.org/)。用户代码可以通过布尔常量 Deno.noColor 测试 NO_COLOR 是否被设置,这不需要环境权限 (--allow-env)。
命令行自动补全
通过 deno completions <shell> 命令可以生成补全脚本。它会输出到 stdout,您应该将它重定向到适当的文件。
Deno 支持的 shell 如下:
- zsh
- bash
- fish
- powershell
- elvish
示例 (bash):
deno completions bash > /usr/local/etc/bash_completion.d/deno.bash
source /usr/local/etc/bash_completion.d/deno.bash
示例 (zsh without framework):
mkdir ~/.zsh # 新建一个文件夹来保存您的补全,它可以在任意地方。
deno completions zsh > .zsh/_deno
然后把以下内容加入您的 .zshrc
fpath=(~/.zsh $fpath)
autoload -Uz compinit
compinit -u
重启您的终端。如果补全仍未加载,您可能需要运行 rm ~/.zcompdump/ 来移除之前生成的补全,然后运行 compinit 来再次生成它们。
示例 (zsh + oh-my-zsh) [推荐]:
mkdir ~/.oh-my-zsh/custom/plugins/deno
deno completions zsh > ~/.oh-my-zsh/custom/plugins/deno/_deno
在此之后,在 ~/.zshrc 文件中的 plugins 标签下增加 deno 插件。对于 antigen 之类的工具,路径将会是 ~/.antigen/bundles/robbyrussell/oh-my-zsh/plugins,命令将是 antigen bundle deno。
编辑器和 IDE
Deno 需要用文件后缀名来支持模块导入和 HTTP 导入。目前,大多数编辑器和语言服务器没有原生支持这点,一些编辑器可能会抛出“无法找到文件”的错误,或是“不必要的文件后缀名”错误。
社区已经开发了一些插件用来解决这些问题。
VS Code
目前内测版的 vscode_deno 扩展已经发布到了 Visual Studio Marketplace。如果遇到 bug 欢迎提 issues。
JetBrains IDE
JetBrains IDE 通过插件来提供 Deno 支持:Deno 插件
要了解有关设置步骤的更多信息,请在 YouTrack 上阅读 这个评论。
Vim 和 NeoVim
如果您安装 CoC(intellisense engine and language server protocol),Vim 对于 Deno/TypeScript 来说非常友好。
当安装完 CoC 后,可以在 Vim 内部运行 :CocInstall coc-deno。你会发现,诸如 gd(转到定义)和 gr(转到/查找引用)之类的东西可以正常工作了。
Emacs
对于目标为 Deno 的 TypeScript 项目,Emacs 工作得很好,只需使用两个插件:
-
tide:这是在 Emacs 中使用 TypeScript 的典范方法。
首先确保您已经安装了 tide,下一步,按照 typescript-deno-plugin 页面的指示,在项目中运行 npm install --save-dev typescript-deno-plugin typescript (npm init -y 是必要的),并在 tsconfig.json 中添加以下设置,然后准备开发吧!
{
  "compilerOptions": {
    "plugins": [
      {
        "name": "typescript-deno-plugin",
        "enable": true, // default is `true`
        "importmap": "import_map.json"
      }
    ]
  }
}
如果您没有在列表中看到您最喜欢的 IDE,或许可以开发一个插件,我们的社区能够帮助您起步:Discord
第一步
这个页面包含一些示例,您可以从中学到 Deno 的基本概念。
我们假设您已经对 JavaScript 有过预先的了解,特别是 async/await。如果您没有了解过 JavaScript,您可能需要先阅读这个指南:JavaScript.
Hello World
Deno 是一个 JavaScript 和 TypeScript 的运行时,并尝试与浏览器兼容并使用现代的功能 (features)。
由于 Deno 具有浏览器兼容性,Hello World 程序与浏览器里的没有区别。
console.log("Welcome to Deno 🦕");
尝试一下:
deno run https://deno.land/std@$STD_VERSION/examples/welcome.ts
发出一个 HTTP 请求
通过 HTTP 请求从服务器获取数据是一件很常见的事。让我们编写一个简单的程序来获取文件并打印到终端。
就像浏览器一样,您可以使用 web 标准的 fetch API 来发出请求。
const url = Deno.args[0];
const res = await fetch(url);

const body = new Uint8Array(await res.arrayBuffer());
await Deno.stdout.write(body);
让我们看看它做了什么:
-
我们取得了第一个命令行参数,存储到变量
url。 -
我们向指定的地址发出请求,等待响应,然后存储到变量
res。 -
我们把响应体解析为一个
ArrayBuffer,等待接收完毕,将其转换为Uint8Array,最后存储到变量body。 -
我们把
body的内容写入标准输出流stdout。
尝试一下:
deno run https://deno.land/std@$STD_VERSION/examples/curl.ts https://example.com
这个程序将会返回一个关于网络权限的错误,我们做错了什么?您可能会想起来,Deno 默认用安全环境执行代码。这意味着您需要显式赋予程序权限,允许它进行一些特权操作,比如网络访问。
用正确的权限选项再试一次:
deno run --allow-net=example.com https://deno.land/std@$STD_VERSION/examples/curl.ts https://example.com
读取一个文件
Deno 也提供内置的 API,它们都位于全局变量 Deno 中。您可以在此找到相关文档:doc.deno.land。
文件系统 API 没有 web 标准形式,所以 Deno 提供了内置的 API。
示例:Unix cat
在这个程序中,每个命令行参数都是一个文件名,参数对应的文件将被依次打开,打印到标准输出流。
const filenames = Deno.args;
for (const filename of filenames) {
  const file = await Deno.open(filename);
  await Deno.copy(file, Deno.stdout);
  file.close();
}
除了内核到用户空间再到内核的必要拷贝,这里的 copy() 函数不会产生额外的昂贵操作,从文件中读到的数据会原样写入标准输出流。这反映了 Deno I/O 流的通用设计目标。
尝试一下:
deno run --allow-read https://deno.land/std@$STD_VERSION/examples/cat.ts /etc/passwd
TCP 服务
示例:TCP echo
这个示例是一个 TCP echo 服务,接收 8080 端口的连接,把接收到的任何数据返回给客户端。
const listener = Deno.listen({ port: 8080 });
console.log("listening on 0.0.0.0:8080");
for await (const conn of listener) {
  Deno.copy(conn, conn);
}
当这个程序启动时,它会抛出一个没有网络权限的错误。
$ deno run https://deno.land/std@$STD_VERSION/examples/echo_server.ts
error: Uncaught PermissionDenied: network access to "0.0.0.0:8080", run again with the --allow-net flag
► $deno$/dispatch_json.ts:40:11
    at DenoError ($deno$/errors.ts:20:5)
    ...
为了安全,Deno 不允许程序访问网络,除非显式赋予权限。使用一个命令行选项来允许程序访问网络:
deno run --allow-net https://deno.land/std@$STD_VERSION/examples/echo_server.ts
尝试用 netcat 向它发送数据。
$ nc localhost 8080
hello world
hello world
像示例 cat.ts 一样,copy() 函数不会产生不必要的内存拷贝。它从内核接收数据包,然后发送回去,就这么简单。
更多示例
您可以在 示例 一章找到更多示例。
命令行界面
Deno 是一个命令行程序。到目前为止,看过这些示例后,您应该熟悉了一些简单的命令,并且已经了解了 shell 的基本用法。
这是查看主要帮助文档的几种方法:
# 使用子命令
deno help

# 使用短选项 —— 输出和上面一样
deno -h

# 使用长选项 —— 输出更加详细
deno --help
Deno 的 CLI 是基于子命令的。上面的帮助命令应该显示了一个子命令列表,例如 deno bundle。
要查看特定于子命令的帮助,您可以参考以下示例:
deno help bundle
deno bundle -h
deno bundle --help
各个子命令的详细指南在 这里。
脚本来源
Deno 可以从多个来源获取脚本,一个文件名,一个 URL,或者是 "-",表示从标准输入读取,在与其他应用集成时很有用。
deno run main.ts
deno run https://mydomain.com/main.ts
cat main.ts | deno run -
脚本参数
通过在脚本名称后指定参数,您可以将用户空间参数传递给要运行的脚本,这些参数与 Deno 运行时选项区分开。
deno run main.ts a b -c --quiet
// main.ts
console.log(Deno.args); // [ "a", "b", "-c", "--quiet" ]
请注意,在脚本名称之后传递的所有内容都将作为脚本参数传递,而不会用作 Deno 运行时选项。
这将导致以下陷阱:
# 正常情况:我们给 net_client.ts 授予网络权限。
deno run --allow-net net_client.ts

# 错误情况:--allow-net 传递为 Deno.args,引发网络权限错误。
deno run net_client.ts --allow-net
有人认为这打破了常规:
一个非位置选项的解析方式会根据位置变化。
然而:
- 这是区分运行时选项和脚本参数的最合乎逻辑的方法。
- 这是区分运行时选项和脚本参数的最符合人体工程学的方法。
- 实际上,这和其他流行的运行时具有相同的行为。
- 试试
node -c index.js和node index.js -c,第一个只会根据-c选项对index.js做语法检查,而第二个会 执行index.js,将-c传递为require("process").argv。
- 试试
下面是在相关的子命令之间共享的逻辑选项组。
完整性选项
影响可以将资源下载到缓存的命令:deno cache,deno run 和 deno test.
--lock <FILE>    检查指定的锁文件
--lock-write     写入锁文件,和 --lock 一起使用
更多信息在 这里。
缓存和编译选项
影响可以增加缓存的命令:deno cache,deno run 和 deno test.
以及影响模块解析、编译配置等的选项。
--config <FILE>               加载 tsconfig.json 配置文件
--importmap <FILE>            不稳定的: 加载导入映射文件
--no-remote                   不要解析远程模块
--reload=<CACHE_BLOCKLIST>    重新加载源代码缓存(重新编译 TypeScript)
--unstable                    启用不稳定 API
运行时选项
影响可以运行用户代码的命令:deno run 和 deno test.
权限选项
这里 列出了所有权限选项。
其他运行时选项
影响运行时环境的更多选项:
--cached-only                要求远程依赖已经被缓存
--inspect=<HOST:PORT>        在 host:port 启动检查器
--inspect-brk=<HOST:PORT>    在 host:port 启动检查器并且暂停执行
--seed <NUMBER>              指定 Math.random() 的随机种子
--v8-flags=<v8-flags>        设置 V8 命令行选项
权限
默认情况下,Deno是安全的。因此 Deno 模块没有文件、网络或环境的访问权限,除非您为它授权。在命令行参数中为 deno 进程授权后才能访问安全敏感的功能。
在以下示例中,mod.ts 只被授予文件系统的只读权限。它无法对其进行写入,或执行任何其他对安全性敏感的操作。
deno run --allow-read mod.ts
权限列表
以下权限是可用的:
- -A, --allow-all 允许所有权限,这将禁用所有安全限制。
- --allow-env 允许环境访问,例如读取和设置环境变量。
- --allow-hrtime 允许高精度时间测量,高精度时间能够在计时攻击和特征识别中使用。
- --allow-net=<allow-net> 允许网络访问。您可以指定一系列用逗号分隔的域名,来提供域名白名单。
- --allow-plugin 允许加载插件。请注意:这是一个不稳定功能。
- --allow-read=<allow-read> 允许读取文件系统。您可以指定一系列用逗号分隔的目录或文件,来提供文件系统白名单。
- --allow-run 允许运行子进程。请注意,子进程不在沙箱中运行,因此没有与 deno 进程相同的安全限制,请谨慎使用。
- --allow-write=<allow-write> 允许写入文件系统。您可以指定一系列用逗号分隔的目录或文件,来提供文件系统白名单。
权限白名单
Deno 还允许您使用白名单控制权限的粒度。
这是一个用白名单限制文件系统访问权限的示例,仅允许访问 /usr 目录,但它会在尝试访问 /etc 目录时失败。
$ deno run --allow-read=/usr https://deno.land/std@$STD_VERSION/examples/cat.ts /etc/passwd
error: Uncaught PermissionDenied: read access to "/etc/passwd", run again with the --allow-read flag
► $deno$/dispatch_json.ts:40:11
    at DenoError ($deno$/errors.ts:20:5)
    ...
改为 /etc 目录,赋予正确的权限,再试一次:
deno run --allow-read=/etc https://deno.land/std@$STD_VERSION/examples/cat.ts /etc/passwd
--allow-write 也一样,代表写入权限。
网络访问
fetch.ts:
const result = await fetch("https://deno.land/");
这是一个设置 host 或 url 白名单的示例:
deno run --allow-net=github.com,deno.land fetch.ts
如果 fetch.ts 尝试与其他域名建立网络连接,那么这个进程将会失败。
允许访问任意地址:
deno run --allow-net fetch.ts
使用 TypeScript
Deno 同时支持 JavaScript 和 TypeScript,它们是 Deno 的第一等语言。 这意味着它需要标准的模块名称,包括 扩展名(或提供正确媒体类型的服务器)。此外,Deno 还拥有“平凡”的模块解析算法。导入模块指定为文件(包括扩展名)或全限定 URL (fully qualified URL)。TypeScript 模块可以被直接导入,例如:
import { Response } from "https://deno.land/std@$STD_VERSION/http/server.ts";
import { queue } from "./collections.ts";
--no-check 选项
当使用 deno run、deno test、deno cache、deno info 或 deno bundle 时,您可以指定 --no-check 选项来禁用 TypeScript 的类型检查。这会大大减少程序的启动时间。当您的编辑器提供了类型检查并且您想要程序启动得尽可能快时(比如当文件变化时自动重启),这个选项将非常有用。
由于 --no-check 不执行 TypeScript 类型检查,我们不能自动删除类型导入导出,这需要类型信息。为此 TypeScript 提供了 import type 和 export type 语法
从一个不同的文件
- 导出类型:
export type { AnInterface } from "./mod.ts";, - 导入类型:
import type { AnInterface } from "./mod.ts";
您可以通过将 TypeScript 编译选项 isolatedModules 设置为 true 来检查此类导入导出的必要性。
您可以在标准库中看到这一选项的示例:tsconfig_test.json。
由于使用 --no-check 时没有类型信息,const enum 是不支持的。
--no-check 也不支持遗留的 import = 和 export = 语法。
使用外部类型定义
开箱即用的 TypeScript 编译器依赖于两种无扩展名 模块和 Node.js 模块解析逻辑,以将类型应用于 JavaScript 模块。
为了弥合这种差距,Deno 支持三种引用类型定义文件的方法,而不必求助于“魔法”的模块解析。
编译提示
如果您要导入 JavaScript 模块,并且知道该模块的类型定义在哪里,您可以在导入时指定类型定义。这采用编译器提示的形式。编译提示告诉 Deno .d.ts 文件的位置和与之相关的导入的 JavaScript 代码。编译提示指令是 @deno-types,当指定时,该值将在编译器中使用,而不是 JavaScript 模块。
例如,如果您有 foo.js,但您知道旁边的 foo.d.ts 是该模块的类型定义,代码将像这样:
// @deno-types="./foo.d.ts"
import * as foo from "./foo.js";
该值遵循与导入模块相同的解析逻辑,这意味着它需要具有扩展名,并且是相对于当前模块的。远程模块也可以使用该说明符。
此编译提示影响下一个 import 语句,或是 export ... from 语句,在编译时,该值将替换模块。像上面的示例一样,Deno 编译器将加载 ./foo.d.ts,而不是 ./foo.js。Deno 在运行时仍然会加载 ./foo.js。
JavaScript 文件中的三斜杠引用指令
如果您要发布由 Deno 使用的模块,并且想要告诉 Deno 类型定义的位置,您可以使用实际代码中的三斜杠指令。
例如,如果您有一个 JavaScript 模块,想为 Deno 提供类型定义的位置,您的 foo.js 可能看起来像这样:
/// <reference types="./foo.d.ts" />
export const foo = "foo";
Deno 会看到这一点,并且在检查类型时,编译器将使用 foo.d.ts 文件,尽管 foo.js 将在运行时加载。
该值遵循与导入模块相同的解析逻辑,这意味着它需要具有扩展名,并且是相对于当前模块的。远程模块也可以使用该说明符。
X-TypeScript-Types 自定义 Header
如果您要发布由 Deno 使用的模块,并且想要告诉 Deno 类型定义的位置,您可以使用自定义 HTTP 头 X-TypeScript-Types,来告诉 Deno 文件位置。
标头的工作方式与上述三斜杠参考相同,这只是意味着 JavaScript 文件本身的内容不需要修改后,并且类型定义的位置可以通过服务器本身确定。
不是所有类型定义都受支持
Deno 将使用编译提示来加载指示的 .d.ts 文件,但有些 .d.ts 文件包含不受支持的功能。具体来说,有些 .d.ts 文件期望能够从其他包中加载或引用类型定义,它们使用模块解析逻辑。
例如,一个包含 node 的类型引用指令,希望解析为像 ./node_modules/@types/node/index.d.ts 的某些路径。由于这取决于非相对性的模块解析算法,Deno 无法处理这种情况。
为什么不在 TypeScript 文件中使用三斜杠类型引用?
TypeScript 编译器支持三斜杠指令,包括类型 参考指令。如果 Deno 使用此功能,则会干扰 TypeScript 编译器。Deno 仅在 JavaScript (包括 JSX)文件中查找指令。
自定义 TypeScript 编译器选项
在 Deno 生态系统中,所有严格标志都被默认启用,以符合 TypeScript 的理想状态。Deno 也支持自定义配置文件,例如 tsconfig.json。
您需要通过显式设置 -c 或 --config 选项,来明确告诉 Deno 在哪里寻找此配置。
deno run -c tsconfig.json mod.ts
以下是 Deno 当前允许的设置及其默认值:
{
  "compilerOptions": {
    "allowJs": false,
    "allowUmdGlobalAccess": false,
    "allowUnreachableCode": false,
    "allowUnusedLabels": false,
    "alwaysStrict": true,
    "assumeChangesOnlyAffectDirectDependencies": false,
    "checkJs": false,
    "disableSizeLimit": false,
    "generateCpuProfile": "profile.cpuprofile",
    "jsx": "react",
    "jsxFactory": "React.createElement",
    "lib": [],
    "noFallthroughCasesInSwitch": false,
    "noImplicitAny": true,
    "noImplicitReturns": true,
    "noImplicitThis": true,
    "noImplicitUseStrict": false,
    "noStrictGenericChecks": false,
    "noUnusedLocals": false,
    "noUnusedParameters": false,
    "preserveConstEnums": false,
    "removeComments": false,
    "resolveJsonModule": true,
    "strict": true,
    "strictBindCallApply": true,
    "strictFunctionTypes": true,
    "strictNullChecks": true,
    "strictPropertyInitialization": true,
    "suppressExcessPropertyErrors": false,
    "suppressImplicitAnyIndexErrors": false,
    "useDefineForClassFields": false
  }
}
有关上述选项和用例的文档,请访问 typescript docs.
注意:以上列表中不包含 Deno 不支持的选项,或者 TypeScript 文档中已经标记为废弃的/实验性的选项。
WebAssembly 支持
Deno 能够运行 WebAssembly 二进制文件。
const wasmCode = new Uint8Array([
  0, 97, 115, 109, 1, 0, 0, 0, 1, 133, 128, 128, 128, 0, 1, 96, 0, 1, 127,
  3, 130, 128, 128, 128, 0, 1, 0, 4, 132, 128, 128, 128, 0, 1, 112, 0, 0,
  5, 131, 128, 128, 128, 0, 1, 0, 1, 6, 129, 128, 128, 128, 0, 0, 7, 145,
  128, 128, 128, 0, 2, 6, 109, 101, 109, 111, 114, 121, 2, 0, 4, 109, 97,
  105, 110, 0, 0, 10, 138, 128, 128, 128, 0, 1, 132, 128, 128, 128, 0, 0,
  65, 42, 11
]);
const wasmModule = new WebAssembly.Module(wasmCode);
const wasmInstance = new WebAssembly.Instance(wasmModule);
console.log(wasmInstance.exports.main().toString());
运行时
包含所有运行时函数(Web API 与全局空间 Deno)的文档可以在 doc.deno.land 找到。
Web API
对于 web 标准中存在的 API,比如 fetch,Deno 使用它们,而不是自己发明新的。
已实现的 Web API 文档:doc.deno.land
已实现的 Web API 的列表在 这里。
已实现的 web API 的 TypeScript 定义:
worker 特定的 API 定义:lib.deno.worker.d.ts
全局空间 Deno
所有非 web 标准的 API 位于全局命名空间 Deno。
这其中包含文件读取、打开 TCP sockets、运行子进程等。
Deno 命名空间 的 TypeScript 定义:lib.deno.ns.d.ts
Deno 特定的 API 定义:doc.deno.land
稳定性
从 Deno 1.0.0 开始,Deno 命名空间内的 API 是稳定的。这意味着我们将尽力使 1.0.0 下的代码在未来的 Deno 版本上继续运行。
但是在现阶段,并非所有的 Deno 功能都可以应用于生产环境。仍处于起草阶段的、还未准备完善的功能被锁定在 --unstable 命令行选项后。
deno run --unstable mod_which_uses_unstable_stuff.ts
传递这个选项可以有如下效果:
- 它将允许在运行时使用不稳定的 API。
- 它将
lib.deno.unstable.d.ts文件添加到用于类型检查的类型脚本定义列表中。这包括deno types的输出。
请注意,不稳定的 API 可能没有经过安全检查,将来可能有破坏性改动,并且还没有准备投入生产。
标准模块
Deno 的 标准模块 尚不稳定。为了体现这点,我们用与 CLI 不同的版本号标记标准模块。和 Deno 命名空间不同,使用标准模块不需要 --unstable 选项(除非该模块使用了不稳定的 Deno 功能)。
程序生命周期
Deno 支持浏览器兼容的生命周期事件 load 和 unload。您可以使用这些事件在程序中提供用于安装 (setup) 和清理 (cleanup) 的代码。
load 事件的侦听器 (listener) 可以是异步 (async) 的,将被等待 (await)。unload 事件的监听器需要是同步的。这两项事件都不能被取消。
示例:
main.ts
import "./imported.ts";

const handler = (e: Event): void => {
  console.log(`got ${e.type} event in event handler (main)`);
};

window.addEventListener("load", handler);

window.addEventListener("unload", handler);

window.onload = (e: Event): void => {
  console.log(`got ${e.type} event in onload function (main)`);
};

window.onunload = (e: Event): void => {
  console.log(`got ${e.type} event in onunload function (main)`);
};

console.log("log from main script");
imported.ts
const handler = (e: Event): void => {
  console.log(`got ${e.type} event in event handler (imported)`);
};

window.addEventListener("load", handler);
window.addEventListener("unload", handler);

window.onload = (e: Event): void => {
  console.log(`got ${e.type} event in onload function (imported)`);
};

window.onunload = (e: Event): void => {
  console.log(`got ${e.type} event in onunload function (imported)`);
};

console.log("log from imported script");
注意,您可以同时使用 window.addEventListener 和 window.onload / window.onunload 来定义事件的处理程序。它们之间有一个主要的区别,让我们运行示例:
$ deno run main.ts
log from imported script
log from main script
got load event in onload function (main)
got load event in event handler (imported)
got load event in event handler (main)
got unload event in onunload function (main)
got unload event in event handler (imported)
got unload event in event handler (main)
所有通过 window.addEventListener 添加的侦听器都被运行,但是在 main.ts 中定义的 window.onload 和 window.onunload 覆盖了 imported.ts 中定义的处理程序。
换句话说,您可以注册多个 window.addEventListener "load" 或
"unload" 事件,但只有最后加载的 window.onload 或 window.onunload 事件将被执行。
权限 API
Permission APIs
这是一个不稳定的 Deno API。 更多信息请查阅 稳定性
权限是在运行 deno 命令时从 CLI 授予的。用户代码通常会假定自己拥有一组必需的权限,但是在执行过程中不能保证 已授予 的权限集合中包含所需权限。
在某些情况下,具有容错能力的程序需要一种在运行时与权限系统进行交互的方法。
权限描述符
在 CLI 中,/foo/bar 的读取权限表示为 --allow-read=/foo/bar。
在运行时,它表示为以下形式:
const desc = { name: "read", path: "/foo/bar" };
其他示例:
// 全局写入权限
const desc1 = { name: "write" };

// `$PWD/foo/bar` 的写入权限
const desc2 = { name: "write", path: "foo/bar" };

// 全局网络权限
const desc3 = { name: "net" };

// 访问 127.0.0.1:8000 的网络权限
const desc4 = { name: "net", url: "127.0.0.1:8000" };

// 高精度计时权限
const desc5 = { name: "hrtime" };
检查权限
检查一个权限是否已被授予:
// deno run --unstable --allow-read=/foo main.ts

const desc1 = { name: "read", path: "/foo" };
console.log(await Deno.permissions.query(desc1));
// PermissionStatus { state: "granted" }

const desc2 = { name: "read", path: "/foo/bar" };
console.log(await Deno.permissions.query(desc2));
// PermissionStatus { state: "granted" }

const desc3 = { name: "read", path: "/bar" };
console.log(await Deno.permissions.query(desc3));
// PermissionStatus { state: "prompt" }
权限状态
权限状态可以是以下之一:
- granted (已授予)
- prompt(提示)
- denied(已禁止)
从 CLI 授予的权限是 { state: "granted" },其他未授予的权限默认为 { state: "prompt" },明确禁止的权限是 { state: "denied" }。
相关说明在 请求权限。
权限强度
检查权限 中第二个查询的直观理解:读取权限授予到 /foo,/foo/bar 包含在 /foo 中,所以允许读取 /foo/bar。
我们也可以说 desc1 强于 desc2。这意味着对于任意从 CLI 授予的权限:
- 如果
desc1状态为{ state: "granted" },那么desc2也是。 - 如果
desc2状态为{ state: "denied" },那么desc1也是。
更多示例:
const desc1 = { name: "write" };
// 强于
const desc2 = { name: "write", path: "/foo" };

const desc3 = { name: "net" };
// 强于
const desc4 = { name: "net", url: "127.0.0.1:8000" };
请求权限
通过 CLI 提示来请求一个未授予的权限:
// deno run --unstable main.ts

const desc1 = { name: "read", path: "/foo" };
const status1 = await Deno.permissions.request(desc1);
// ⚠️ Deno requests read access to "/foo". Grant? [g/d (g = grant, d = deny)] g
console.log(status1);
// PermissionStatus { state: "granted" }

const desc2 = { name: "read", path: "/bar" };
const status2 = await Deno.permissions.request(desc2);
// ⚠️ Deno requests read access to "/bar". Grant? [g/d (g = grant, d = deny)] d
console.log(status2);
// PermissionStatus { state: "denied" }
如果当前权限状态是 "prompt",用户终端中会出现一个提示来询问用户是否要授权。desc1 的授权请求通过,所以新的状态会返回,程序继续执行。desc2 的授权被禁止,权限状态会从 "prompt" 降级为 "denied"。
如果当前权限状态已经是 "granted" 或 "denied",请求将表现为一个检查,直接返回当前权限状态,这会阻止多余的提示。
放弃权限
将权限状态从 "granted" 降级为 "prompt":
// deno run --unstable --allow-read=/foo main.ts

const desc = { name: "read", path: "/foo" };
console.log(await Deno.permissions.revoke(desc));
// PermissionStatus { state: "prompt" }
然而,当尝试放弃 一部分 权限时,会发生什么?
// deno run --unstable --allow-read=/foo main.ts

const desc = { name: "read", path: "/foo/bar" };
console.log(await Deno.permissions.revoke(desc));
// PermissionStatus { state: "granted" }
它不会被放弃。
想象 Deno 存储了一个 明确授予的权限描述符 的内部集合。在 CLI 中指定 --allow-read=/foo,/bar 会把这一集合初始化为:
[
  { name: "read", path: "/foo" },
  { name: "read", path: "/bar" },
];
一个运行时授权 { name: "write", path: "/foo" } 会更新这个集合:
[
  { name: "read", path: "/foo" },
  { name: "read", path: "/bar" },
  { name: "write", path: "/foo" },
];
Deno 的权限撤销算法将所有不强于参数权限描述符的元素从集合中移除。
要确保 desc 不再有效,您需要传递一个参数权限描述符,它必须 强于 集合中所有 强于 desc 的 显式授予的权限描述符。
// deno run --unstable --allow-read=/foo main.ts

const desc = { name: "read", path: "/foo/bar" };
console.log(await Deno.permissions.revoke(desc)); // 无效
// PermissionStatus { state: "granted" }

const strongDesc = { name: "read", path: "/foo" };
await Deno.permissions.revoke(strongDesc); // 正确

console.log(await Deno.permissions.query(desc));
// PermissionStatus { state: "prompt" }
编译器 API
这是一个不稳定的 Deno API。 更多信息请查阅 稳定性
Deno 支持对内置 TypeScript 编译器的运行时访问。Deno 命名空间中有三种方法提供此访问。
Deno.compile()
这类似于 deno cache,因为它可以获取代码、缓存代码、编译代码,但不运行代码。它最多接受三个参数,rootName、可选的 sources 和可选的 options。
rootName 是用于生成目标程序的根模块。这类似于在 deno run --reload example.ts 中在命令行上传递的模块名。
sources 是一个哈希表,其中键是完全限定的模块名称,值是模块的文本源。如果传递了 sources,Deno 将从该哈希表中解析所有模块,而不会尝试在 Deno 之外解析它们。如果没有提供 sources,Deno 将解析模块,就像根模块已经在命令行上传递了一样。Deno 还将缓存所有的这些资源。所有已解析的资源都会被当成动态导入对待,导入行为是否需要读取和网络权限取决于目标在本地还是远程。
options 参数是一组 Deno.CompilerOptions 类型的选项,它是包含 Deno 支持选项的 TypeScript 编译器选项的子集。
该方法返回元组。第一个参数包含与代码相关的任何诊断信息(语法或类型错误)。第二个参数是一个映射,其中键是输出文件名,值是内容。
提供 sources 的一个例子:
const [diagnostics, emitMap] = await Deno.compile("/foo.ts", {
  "/foo.ts": `import * as bar from "./bar.ts";\nconsole.log(bar);\n`,
  "/bar.ts": `export const bar = "bar";\n`,
});

assert(diagnostics == null); // 确保没有返回诊断信息
console.log(emitMap);
我们希望 map 包含 4 个 “文件(files)” ,分别命名为 /foo.js.map,/foo.js,/bar.js.map,和 /bar.js。
当不提供资源时,您可以使用本地或远程模块,就像在命令行上做的那样。所以您可以这样做:
const [diagnostics, emitMap] = await Deno.compile(
  "https://deno.land/std@$STD_VERSION/examples/welcome.ts",
);
在这种情况下,emitMap 将包含一个 console.log() 语句。
Deno.bundle()
这与 deno bundle 在命令行上的工作非常相似。 它也与 Deno.compile() 类似,只是它不返回文件映射,而是只返回一个字符串,这是一个自包含的 JavaScript ES 模块,它将包含提供或解析的所有代码,以及提供的根模块的所有导出。它最多接受三个参数,rootName、可选的 sources 和可选的 options。
rootName 是用于生成目标程序的根模块。这类似于在 deno bundle example.ts 中在命令行上传递的模块名。
sources 是一个哈希表,其中键是完全限定的模块名称,值是模块的文本源。如果传递了 sources,Deno 将从该哈希表中解析所有模块,而不会尝试在 Deno 之外解析它们。如果没有提供 sources,Deno 将解析模块,就像根模块已经在命令行上传递了一样。Deno 还将缓存所有的这些资源。所有已解析的资源都会被当成动态导入对待,导入行为是否需要读取和网络权限取决于目标在本地还是远程。
options 参数是一组 Deno.CompilerOptions 类型的选项,它是包含 Deno 支持选项的 TypeScript 编译器选项的子集。
提供 sources 的一个例子:
const [diagnostics, emit] = await Deno.bundle("/foo.ts", {
  "/foo.ts": `import * as bar from "./bar.ts";\nconsole.log(bar);\n`,
  "/bar.ts": `export const bar = "bar";\n`,
});

assert(diagnostics == null); // 确保没有返回诊断信息
console.log(emit);
我们希望 emit 是一个 ES 模块的文本,它将包含两个模块的输出源。
当不提供资源时,您可以使用本地或远程模块,就像在命令行上做的那样。所以您可以这样做:
const [diagnostics, emit] = await Deno.bundle(
  "https://deno.land/std@$STD_VERSION/http/server.ts",
);
在这种情况下,emit 将是一个自包含的 JavaScript ES 模块,并解析了所有依赖项,导出与源模块相同的导出。
Deno.transpileOnly()
这是基于 TypeScript 函数 transpileModule() 的。所有这些操作都会“擦除”模块中的任何类型并释放 JavaScript。没有类型检查和依赖关系的解析。它最多接受两个参数,第一个参数是哈希表,其中键是模块名称,值是内容。模块名称的唯一用途是在将信息放入源映射时,显示源文件名称是什么。第二个参数包含 Deno.CompilerOptions 类型的可选 options。函数通过映射解析,其中键是提供的源模块名称,值是具有 source 属性和可选 map 属性的对象。第一个是模块的输出内容。 map 属性是源映射。源映射是默认提供的,但可以通过 options 参数关闭。
举个例子:
const result = await Deno.transpileOnly({
  "/foo.ts": `enum Foo { Foo, Bar, Baz };\n`,
});

console.log(result["/foo.ts"].source);
console.log(result["/foo.ts"].map);
我们期望 enum 被重写成一个构造可枚举的 IIFE,并且映射被定义。
引用 TypeScript 库文件
当您使用 deno run 或其他 TypeScript 类型的 Deno 命令时,该代码将根据描述 Deno 支持的环境的自定义库进行评估。默认情况下,TypeScript 类型的编译器运行时 API 也使用这些库(Deno.compile() 和 Deno.bundle())。
但是,如果您希望为其他运行时编译或捆绑 TypeScript,则您可能希望重载默认库。为此,运行时 API 支持编译器选项中的 lib 属性。例如,如果你的 TypeScript 代码是为浏览器准备的,您可以使用 TypeScript 的 "dom" 库:
const [errors, emitted] = await Deno.compile(
  "main.ts",
  {
    "main.ts": `document.getElementById("foo");\n`,
  },
  {
    lib: ["dom", "esnext"],
  },
);
有关 TypeScript 支持的所有库的列表,请参见 lib 编译器选项。
不要忘记包含 JavaScript 库
就像 tsc 一样,当您提供一个 lib 编译器选项时,它会覆盖默认的选项,这意味着基本的 JavaScript 库不会被包含,而您应该包含最能代表您的目标运行时的选项(例如 es5,es2015,es2016,es2017,es2018,es2019,es2020 或 esnext)。
包含 Deno 命名空间
除了 TypeScript 提供的库之外,还有四个内置在 Deno 中的库可以引用:
deno.ns- 提供Deno命名空间deno.shared_globals- 提供 Deno 运行时支持的全局接口和变量,然后由最终运行时库公开deno.window- 公开全局变量和 Deno 主工作进程中可用的 Deno 命名空间,是运行时编译器的默认 APIdeno.worker- 公开在 Deno 下的工作进程中可用的全局变量。
因此,要将 Deno 命名空间添加到编译中,需要在数组中包含 deno.ns 库,例如:
const [errors, emitted] = await Deno.compile(
  "main.ts",
  {
    "main.ts": `document.getElementById("foo");\n`,
  },
  {
    lib: ["dom", "esnext", "deno.ns"],
  },
);
注意,Deno 命名空间需要一个 ES2018 或更新的运行时环境。这意味着,如果您使用的库“低于” ES2018,那么您将得到编译过程中输出的错误。
使用三斜杠引用(triple-slash reference)
您不必在编译器选项中指定 lib。Deno 支持对库的三斜杠引用,并可以嵌入到文件的内容中。举个例子,如果你有一个 main.ts:
/// <reference lib="dom" />

document.getElementById("foo");
它可以编译,且不会出现下面这样的错误:
const [errors, emitted] = await Deno.compile("./main.ts", undefined, {
  lib: ["esnext"],
});
注意,dom 库与 Deno 的默认类型库中定义的一些默认全局变量有冲突。为了避免这种情况,需要在编译器选项中为运行时编译器 API 指定一个 lib 选项。
Worker
Deno 支持 Web Worker API.
Worker 能够用来在多个线程中运行代码,Worker 的每个实例都会在一个单独的线程中运行,这个线程专属于它。
目前,Deno 只支持 module 类型的 worker,因此在创建新的 worker 时必须传递 type: "module" 选项。
目前,相对模块说明符 (Relative module specifiers) 尚不支持。作为代替,您可以用 URL 构造函数和 import.meta.url 来为附近的脚本创建说明符。
// Good
new Worker(new URL("worker.js", import.meta.url).href, { type: "module" });

// Bad
new Worker(new URL("worker.js", import.meta.url).href);
new Worker(new URL("worker.js", import.meta.url).href, { type: "classic" });
new Worker("./worker.js", { type: "module" });
权限
创建一个新的 Worker 实例的行为与动态导入类似,因此 Deno 需要适当的权限来做这个操作。
对于使用本地模块的 worker,Deno 需要读取 (--allow-read) 权限:
main.ts
new Worker(new URL("worker.ts", import.meta.url).href, { type: "module" });
worker.ts
console.log("hello world");
self.close();
$ deno run main.ts
error: Uncaught PermissionDenied: read access to "./worker.ts", run again with the --allow-read flag

$ deno run --allow-read main.ts
hello world
对于使用远程模块的 worker,Deno 需要网络 (--allow-net) 权限:
main.ts
new Worker("https://example.com/worker.ts", { type: "module" });
worker.ts
console.log("hello world");
self.close();
$ deno run main.ts
error: Uncaught PermissionDenied: net access to "https://example.com/worker.ts", run again with the --allow-net flag

$ deno run --allow-net main.ts
hello world
在 Worker 中使用 Deno
这是一个不稳定的 Deno 特性。 更多信息请查阅 稳定性
默认情况下,Deno 命名空间在 worker 作用域中不可用。
要想启用 Deno 命名空间,在创建新的 worker 时传递 deno: true 选项:
main.js
const worker = new Worker(new URL("worker.js", import.meta.url).href, {
  type: "module",
  deno: true,
});
worker.postMessage({ filename: "./log.txt" });
worker.js
self.onmessage = async (e) => {
  const { filename } = e.data;
  const text = await Deno.readTextFile(filename);
  console.log(text);
  self.close();
};
log.txt
hello world
$ deno run --allow-read --unstable main.js
hello world
当 Deno 命名空间在 worker 作用域中启用时,此 worker 继承创建者的权限(使用类似 --allow-* 的选项指定的权限)。
我们计划提供 worker 权限的配置方法。
与外部代码连接
在 入门 章节中,我们看到 Deno 能够从 URL 执行脚本。像浏览器中的 JavaScript 一样,Deno 可以从 URL 直接导入代码库。
这个示例使用 URL 来导入一个断言库:
test.ts
import { assertEquals } from "https://deno.land/std@$STD_VERSION/testing/asserts.ts";

assertEquals("hello", "hello");
assertEquals("world", "world");

console.log("Asserted! ✓");
尝试运行一下:
$ deno run test.ts
Compile file:///mnt/f9/Projects/github.com/denoland/deno/docs/test.ts
Download https://deno.land/std@$STD_VERSION/testing/asserts.ts
Download https://deno.land/std@$STD_VERSION/fmt/colors.ts
Download https://deno.land/std@$STD_VERSION/testing/diff.ts
Asserted! ✓
对于这个程序,我们不需要提供 --allow-net 选项。当它访问网络时,Deno 运行时有着特殊权限来下载模块并缓存到磁盘。
Deno 在一个特殊目录缓存了远程模块,该路径可以被 DENO_DIR 指定,如果没有指定,默认为系统缓存目录。下一次运行这个程序时无需下载。如果这个程序没有改动,它不会被再次编译。
系统缓存目录默认为:
- Linux/Redox:
$XDG_CACHE_HOME/denoor$HOME/.cache/deno - Windows:
%LOCALAPPDATA%/deno(%LOCALAPPDATA%=FOLDERID_LocalAppData) - macOS:
$HOME/Library/Caches/deno
如果失败,该路径设置为 $HOME/.deno。
FAQ
如何导入特定版本?
只需在 URL 中指定版本。举个例子,这个 URL 指定了要运行的版本 https://unpkg.com/liltest@0.0.5/dist/liltest.js。
到处导入 URL 似乎很麻烦
如果其中一个 URL 链接到一个完全不同的库版本,该怎么办?
在大型项目中到处维护 URL 是否容易出错?
解决办法是在一个中心化的 deps.ts 中重新导出所依赖的外部库,它和 Node 的 package.json 具有相同的作用。
举个例子,您正在一个大型项目中使用一个断言库,您可以创建一个 deps.ts 文件来导出第三方代码,而不是到处导入 "https://deno.land/std@$STD_VERSION/testing/asserts.ts"。
deps.ts
export {
  assert,
  assertEquals,
  assertStrContains,
} from "https://deno.land/std@$STD_VERSION/testing/asserts.ts";
在这个项目中,您可以从 deps.ts 导入,避免对相同的 URL 产生过多引用。
import { assertEquals, runTests, test } from "./deps.ts";
这种设计避免了由包管理软件、集中的代码存储库和多余的文件格式所产生的大量复杂性。
如何信任可能更改的 URL?
使用 --lock 命令行选项,通过一个锁文件 (lock file),您可以确保从一个 URL 下载的代码和初始开发时一样。更多信息请看 这里。
如果依赖宕机怎么办?源代码将不再可用。
像上面一样,这是 任何 远程依赖系统都要面对的问题。
依赖外部服务在开发时很方便,但在生产环境很脆弱。生产级软件总是应该打包 (vendor) 所有依赖。
在 Node 中,这需要将 node_modules 检入版本控制系统。
在 Deno 中,这需要在运行时将 $DENO_DIR 指向项目内的目录,同样把依赖检入版本控制系统。
# 下载依赖
DENO_DIR=./deno_dir deno cache src/deps.ts

# 确保需要缓存的任何命令都设置了 `DENO_DIR` 变量
DENO_DIR=./deno_dir deno test src

# 将缓存目录检入版本控制
git add -u deno_dir
git commit
重新加载特定的模块
默认情况下,缓存中的模块将被重用,而无需获取或重新编译它。有时这不是期望的行为,您可以强制 deno 重新下载模块并重新编译到缓存中。您可以使用 deno cache 子命令的--reload 选项来使本地 DENO_DIR 缓存无效。
其用法描述如下:
重新加载所有内容
deno cache --reload my_module.ts
重新加载指定模块
有时我们只想升级某些模块,可以通过将参数传递给 --reload 选项来控制它。
重新加载所有 $STD_VERSION 的标准模块:
deno cache --reload=https://deno.land/std@$STD_VERSION my_module.ts
为了重新加载特定的模块(在这个例子中是 colors 和 file system copy),需要使用逗号来分隔 URL:
deno cache --reload=https://deno.land/std@$STD_VERSION/fs/copy.ts,https://deno.land/std@$STD_VERSION/fmt/colors.ts my_module.ts
完整性检查与锁定文件
介绍
假设您的模块依赖于远程模块 https://some.url/a.ts。当第一次编译您的模块时,a.ts 被下载、编译、缓存。它将保持这样,直到您在一个新的机器上运行您的模块(生产环境?)或是重新加载缓存(例如通过 deno cache --reload)。但当 https://some.url/a.ts 的内容变化时会发生什么?这将导致您的生产模块使用了和本地模块不同的依赖。Deno 的解决方法是使用完整性检查与锁定文件。
缓存与锁定文件
Deno 可以使用一个较小的 JSON 文件存储和检查模块的子资源完整性。
使用 --lock=lock.json 启用和指定锁文件检查。
要更新或创建锁,可以使用 --lock=lock.json --lock-write。--lock=lock.json 告诉 Deno 要使用哪个锁文件,--lock-write 用来向锁文件输出依赖的哈希值。 (--lock-write 必须和 --lock 一起使用)
一个锁文件可能看起来像这样,针对依赖项存储文件的哈希值:
{
  "https://deno.land/std@$STD_VERSION/textproto/mod.ts": "3118d7a42c03c242c5a49c2ad91c8396110e14acca1324e7aaefd31a999b71a4",
  "https://deno.land/std@$STD_VERSION/io/util.ts": "ae133d310a0fdcf298cea7bc09a599c49acb616d34e148e263bcb02976f80dee",
  "https://deno.land/std@$STD_VERSION/async/delay.ts": "35957d585a6e3dd87706858fb1d6b551cb278271b03f52c5a2cb70e65e00c26a",
   ...
}
一个典型的工作流看起来像这样:
// 向 "src/deps.ts" 添加一个新的依赖,在别处使用。
export { xyz } from "https://unpkg.com/xyz-lib@v0.9.0/lib.ts";
# 创建或更新锁文件 "lock.json"
deno cache --lock=lock.json --lock-write src/deps.ts

# 在提交时包含这一变化
git add -u lock.json
git commit -m "feat: Add support for xyz using xyz-lib"
git push
另一台机器上的合作者刚刚把项目克隆下来:
# 下载、缓存并检查项目的依赖
deno cache -r --lock=lock.json src/deps.ts

# 在这完成之后,您可以安心开发了
deno test --allow-read src
运行时验证
像上面的缓存一样,您也可以在使用 deno run 子命令时配合--lock=lock.json 选项,从而在运行期间验证所有被锁定的模块的完整性。请记住,这只会针对先前添加到 lock.json 文件中的依赖项进行验证。新的依赖项将被缓存,但不会被检验。
您也可以通过使用 --cached-only 选项来要求远程依赖都已经被缓存。
deno run --lock=lock.json --cached-only mod.ts
如果依赖树中有尚未缓存的 mod.ts 依赖项,此操作将失败。
代理(Proxies)
Deno 支持模块下载和 Web 标准 fetch API 的代理。
代理配置从环境变量中读取: HTTP_PROXY 和 HTTPS_PROXY。
在 Windows 的环境下,如果没有发现环境变量,Deno 会从注册表中读取代理。
导入映射(Import maps)
这是一个不稳定的特性。 更多信息请查阅 稳定性
Deno 支持 导入映射。
您可以通过 --importmap=<FILE> 的命令行选项使用导入映射。
目前的限制:
- 只支持单个导入映射
- 没有 fallback URL
- Deno 不支持
std:命名空间 - 仅支持
file:,http:和https:协议
示例:
import_map.json
{
   "imports": {
      "fmt/": "https://deno.land/std@$STD_VERSION/fmt/"
   }
}
color.ts
import { red } from "fmt/colors.ts";

console.log(red("hello world"));
运行:
$ deno run --importmap=import_map.json --unstable color.ts
为绝对导入使用起始目录:
// import_map.json

{
  "imports": {
    "/": "./"
  }
}
// main.ts

import { MyUtil } from "/util.ts";
您可以映射一个不同的目录(比如 src):
// import_map.json

{
  "imports": {
    "/": "./src"
  }
}
标准库
Deno 提供一组标准模块,它们经过核心团队审计,保证能在 Deno 上工作。
标准库地址:https://deno.land/std@$STD_VERSION/
版本和稳定性
标准库尚不稳定,因此采用与 Deno 不同的版本号。每次 Deno 发布时,标准库也会一起发布。
最新的发布请查阅 https://deno.land/std@$STD_VERSION/ 或 https://deno.land/std@$STD_VERSION/version.ts。
我们强烈建议:始终使用确定版本的标准库,以避免意外的改动。
例如,连接到随时可能更改的主分支时可能会导致编译错误或意外行为:
// 从 master 导入,这应当避免
import { copy } from "https://deno.land/std@$STD_VERSION/fs/copy.ts";
更好的选择是使用不可变且不会更改的 std 库版本:
// 从不可变的 std v0.50.0 导入
import { copy } from "https://deno.land/std@$STD_VERSION/fs/copy.ts";
排错 (Troubleshooting)
标准库中的一些模块使用了不稳定的 Deno API。
不用 --unstable 命令行选项运行这些模块会产生一些 TypeScript 错误,表示 Deno 命名空间中不存在一些 API:
// main.ts
import { copy } from "https://deno.land/std@$STD_VERSION/fs/copy.ts";

copy("log.txt", "log-old.txt");
$ deno run --allow-read --allow-write main.ts
Compile file:///dev/deno/main.ts
Download https://deno.land/std@$STD_VERSION/fs/copy.ts
Download https://deno.land/std@$STD_VERSION/fs/ensure_dir.ts
Download https://deno.land/std@$STD_VERSION/fs/_util.ts
error: TS2339 [ERROR]: Property 'utime' does not exist on type 'typeof Deno'.
    await Deno.utime(dest, statInfo.atime, statInfo.mtime);
               ~~~~~
    at https://deno.land/std@$STD_VERSION/fs/copy.ts:90:16

TS2339 [ERROR]: Property 'utimeSync' does not exist on type 'typeof Deno'.
    Deno.utimeSync(dest, statInfo.atime, statInfo.mtime);
         ~~~~~~~~~
    at https://deno.land/std@$STD_VERSION/fs/copy.ts:101:10
解决方法是加上 --unstable 选项:
deno run --allow-read --allow-write --unstable main.ts
要确定哪些 API 是不稳定的,请查阅类型声明 lib.deno.unstable.d.ts
这个问题会在不远的将来解决。如果您依赖的特定模块在没有该选项的情况下成功编译,则可以忽略该选项。
测试
Deno 有一个内置的测试器,可以用来测试 JavaScript 或 TypeScript 代码。
编写测试
要定义测试,需要使用要测试的名称和函数调用 Deno.test。
您可以使用两种风格:
// 传递名称和函数,紧凑的形式,但不能配置
Deno.test("hello world #1", () => {
  const x = 1 + 2;
  assertEquals(x, 3);
});

// 全面的测试定义,更长的形式,但可配置(请参见下文)
Deno.test({
  name: "hello world #2",
  fn: () => {
    const x = 1 + 2;
    assertEquals(x, 3);
  },
});
断言
在 https://deno.land/std@$STD_VERSION/testing 上有一些有用的断言实用程序,可以简化测试:
import {
  assertEquals,
  assertArrayContains,
} from "https://deno.land/std@$STD_VERSION/testing/asserts.ts";

Deno.test("hello world", () => {
  const x = 1 + 2;
  assertEquals(x, 3);
  assertArrayContains([1, 2, 3, 4, 5, 6], [3], "Expected 3 to be in the array");
});
异步函数
您还可以通过传递一个测试函数来测试异步代码,该函数返回一个 promise。
为此,您可以在定义函数时使用 async 关键字:
import { delay } from "https://deno.land/std@$STD_VERSION/async/delay.ts";

Deno.test("async hello world", async () => {
  const x = 1 + 2;

  // await some async task
  await delay(100);

  if (x !== 3) {
    throw Error("x should be equal to 3");
  }
});
资源和异步操作清理器
Deno 中的某些操作在资源表(在此处了解更多)中创建资源。 这些资源应该在使用完后关闭。
对于每个测试定义,测试器会检查此测试中创建的所有资源是否已关闭,以防止资源“泄漏”。
默认情况下,这对所有测试都是启用的,但可以通过在测试定义中将 sanitizeResources 布尔值设置为 false 来禁用。
对于异步操作(如与文件系统交互)也是如此。测试器检查您在测试中启动的每个操作是否在测试结束之前完成。默认情况下,这对所有测试都是启用的,但可以通过在测试定义中将 sanitizeps 布尔值设置为 false 来禁用。
Deno.test({
  name: "leaky test",
  fn() {
    Deno.open("hello.txt");
  },
  sanitizeResources: false,
  sanitizeOps: false,
});
运行测试
要运行测试,使用 deno test 命令,传入包含测试函数的文件。您也可以忽略文件名,这样当前目录树内所有符合通配符 {*_,*.,}test.{js,mjs,ts,jsx,tsx} 的测试都会被运行。如果您传入了一个目录,那么该目录下所有匹配的文件都会被运行。
# 运行当前目录树内的所有测试
deno test

# 运行 util 目录内的所有测试
deno test util/

# 只运行 my_test.ts
deno test my_test.ts
deno test 和 deno run 使用相同的权限模型,比如在测试期间有可能要求 --allow-write 来写入文件系统。
使用 deno help test 命令来查看相关选项。
过滤
有许多选项可以过滤要运行的测试。
命令行过滤
使用 --filter 选项可以单独或成组运行测试。
该选项接受一个字符串或一个模式作为值。
假设有以下测试:
Deno.test({ name: "my-test", fn: myTest });
Deno.test({ name: "test-1", fn: test1 });
Deno.test({ name: "test2", fn: test2 });
以下命令将会运行所有包含 "test" 的测试:
deno test --filter "test" tests/
以下命令将会运行匹配该模式的测试,即第二个和第三个:
deno test --filter "/test-*\d/" tests/
像 JavaScript 的正则表达式语法糖一样,Deno 会将用斜杠包裹的过滤字符串认为是模式。
测试定义过滤
在测试本身中,您有两个过滤选项。
忽略测试
有时您希望忽略基于某种条件的测试(例如您只希望在 Windows 上运行测试)。
为此,您可以使用 ignore 测试定义中的布尔值。
如果它被设置为 true,则测试将被跳过。
Deno.test({
  name: "do macOS feature",
  ignore: Deno.build.os !== "darwin",
  fn() {
    doMacOSFeature();
  },
});
启用测试
有时您可能会在大型测试中遇到问题,只想专注于有问题的测试,忽略其他测试。
为此您可以使用 only 选项来让测试框架只运行一部分测试。多个测试可以设置此选项。尽管测试框架将报告每个测试的成功或失败,但当任何一个测试标记为 only 时,总体测试将始终失败。因为这只是一种临时措施,几乎会禁用所有测试。
Deno.test({
  name: "Focus on this test only",
  only: true,
  fn() {
    testComplicatedStuff();
  },
});
快速失败
如果您有一个运行时间较长的测试,并希望它在第一次失败时停止运行,则可以在运行测试时指定 --failfast 选项。
deno test --failfast
断言
为了帮助开发者编写测试,Deno 标准库提供了内置的 断言模块,可从 https://deno.land/std@$STD_VERSION/testing/asserts.ts 导入。
import { assert } from "https://deno.land/std@$STD_VERSION/testing/asserts.ts";

Deno.test("Hello Test", () => {
  assert("Hello");
});
断言模块提供了九个断言函数:
assert(expr: unknown, msg = ""): asserts exprassertEquals(actual: unknown, expected: unknown, msg?: string): voidassertNotEquals(actual: unknown, expected: unknown, msg?: string): voidassertStrictEquals(actual: unknown, expected: unknown, msg?: string): voidassertStringContains(actual: string, expected: string, msg?: string): voidassertArrayContains(actual: unknown[], expected: unknown[], msg?: string): voidassertMatch(actual: string, expected: RegExp, msg?: string): voidassertThrows(fn: () => void, ErrorClass?: Constructor, msgIncludes = "", msg?: string): ErrorassertThrowsAsync(fn: () => Promise<void>, ErrorClass?: Constructor, msgIncludes = "", msg?: string): Promise<Error>
断言
assert 方法是一个简单的“真值”断言,可用于断言任何可以推导为 true 的值。
Deno.test("Test Assert", () => {
  assert(1);
  assert("Hello");
  assert(true);
});
相等性
可用的相等性断言有三个:assertEquals(),assertNotEquals() 和 assertStrictEquals().
assertEquals() 和 assertNotEquals() 方法提供常规的相等性检查,并能够断言基本类型和对象的相等性。
Deno.test("Test Assert Equals", () => {
  assertEquals(1, 1);
  assertEquals("Hello", "Hello");
  assertEquals(true, true);
  assertEquals(undefined, undefined);
  assertEquals(null, null);
  assertEquals(new Date(), new Date());
  assertEquals(new RegExp("abc"), new RegExp("abc"));

  class Foo {}
  const foo1 = new Foo();
  const foo2 = new Foo();

  assertEquals(foo1, foo2);
});

Deno.test("Test Assert Not Equals", () => {
  assertNotEquals(1, 2);
  assertNotEquals("Hello", "World");
  assertNotEquals(true, false);
  assertNotEquals(undefined, "");
  assertNotEquals(new Date(), Date.now());
  assertNotEquals(new RegExp("abc"), new RegExp("def"));
});
assertStrictEquals() 基于 === 运算符提供了更简单、严格的检查。相同对象的两个实例不会判断为相等,因为引用不相同。
Deno.test("Test Assert Strict Equals", () => {
  assertStrictEquals(1, 1);
  assertStrictEquals("Hello", "Hello");
  assertStrictEquals(true, true);
  assertStrictEquals(undefined, undefined);
});
assertStrictEquals() 最好用于精确判断两个基本类型的相等性。
包含
assertStringContains() 和 assertArrayContains() 可用于断言包含关系。
assertStringContains() 方法检查一个字符串是否包含了预期的字符串。
Deno.test("Test Assert String Contains", () => {
  assertStringContains("Hello World", "Hello");
});
assertArrayContains() 方法稍微高级一些,能够找到一个数组内的值,或是子数组。
Deno.test("Test Assert Array Contains", () => {
  assertArrayContains([1, 2, 3], [1]);
  assertArrayContains([1, 2, 3], [1, 2]);
  assertArrayContains(Array.from("Hello World"), Array.from("Hello"));
});
正则表达式
通过 assertMatch() 方法断言正则匹配。
Deno.test("Test Assert Match", () => {
  assertMatch("abcdefghi", new RegExp("def"));

  const basicUrl = new RegExp("^https?://[a-z.]+.com$");
  assertMatch("https://www.google.com", basicUrl);
  assertMatch("http://facebook.com", basicUrl);
});
抛出错误
在 Deno 中有两种方式断言抛出错误的行为:assertThrows() 和 assertAsyncThrows()。
两种方式都能检查抛出错误 的类型和信息。
两种方式的区别是 assertThrows() 接收一个标准函数,而 assertAsyncThrows() 接收一个返回 Promise 的函数。
assertThrows() 将检查抛出的错误,也可以检查所抛出的错误的类型是否正确,并判断错误消息是否符合预期。
Deno.test("Test Assert Throws", () => {
  assertThrows(
    () => {
      throw new Error("Panic!");
    },
    Error,
    "Panic!",
  );
});
assertAsyncThrows() 稍微复杂一点,主要是因为它处理 Promise。它将捕获 Promise 中抛出的错误或 rejection。您还可以选择检查错误类型和错误消息。
Deno.test("Test Assert Throws Async", () => {
  assertThrowsAsync(
    () => {
      return new Promise(() => {
        throw new Error("Panic! Threw Error");
      });
    },
    Error,
    "Panic! Threw Error",
  );

  assertThrowsAsync(
    () => {
      return Promise.reject(new Error("Panic! Reject Error"));
    },
    Error,
    "Panic! Reject Error",
  );
});
自定义消息
Deno 的每个内置断言都允许您覆盖标准 CLI 错误消息。
这个示例将输出 "Values Don't Match!",而不是标准 CLI 错误消息。
Deno.test("Test Assert Equal Fail Custom Message", () => {
  assertEquals(1, 2, "Values Don't Match!");
});
内置工具
Deno 提供了一些内置的工具,在处理 JavaScript 和 TypeScript 时很有用。
- 打包器 (
deno bundle) - 调试器 (
--inspect, --inspect-brk) - 依赖检查器 (
deno info) - 文档生成器 (
deno doc) - 代码格式化 (
deno fmt) - 测试 (
deno test) - linter (
deno lint)
调试器 (debugger)
Deno 支持 V8 Inspector Protocol.
使用 Chrome Devtools 或其他支持该协议的客户端(比如 VSCode)能够调试 Deno 程序。
要启用调试功能,用 --inspect 或 --inspect-brk 选项运行 Deno。
--inspect 选项允许在任何时间点连接调试器,而 --inspect-brk 选项会等待调试器连接,在第一行代码处暂停执行。
Chrome Devtools
让我们用 Chrome 开发者工具来调试一个程序,我们将使用来自 std 的 file_server.ts,这是一个静态文件服务。
使用 --inspect-brk 选项,在第一行代码处暂停执行。
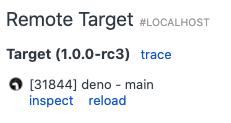
$ deno run --inspect-brk --allow-read --allow-net https://deno.land/std@$STD_VERSION/http/file_server.ts
Debugger listening on ws://127.0.0.1:9229/ws/1e82c406-85a9-44ab-86b6-7341583480b1
Download https://deno.land/std@$STD_VERSION/http/file_server.ts
Compile https://deno.land/std@$STD_VERSION/http/file_server.ts
...
打开 chrome://inspect,点击 target 旁边的 Inspect。
开发者工具加载所有模块时可能会等待几秒。
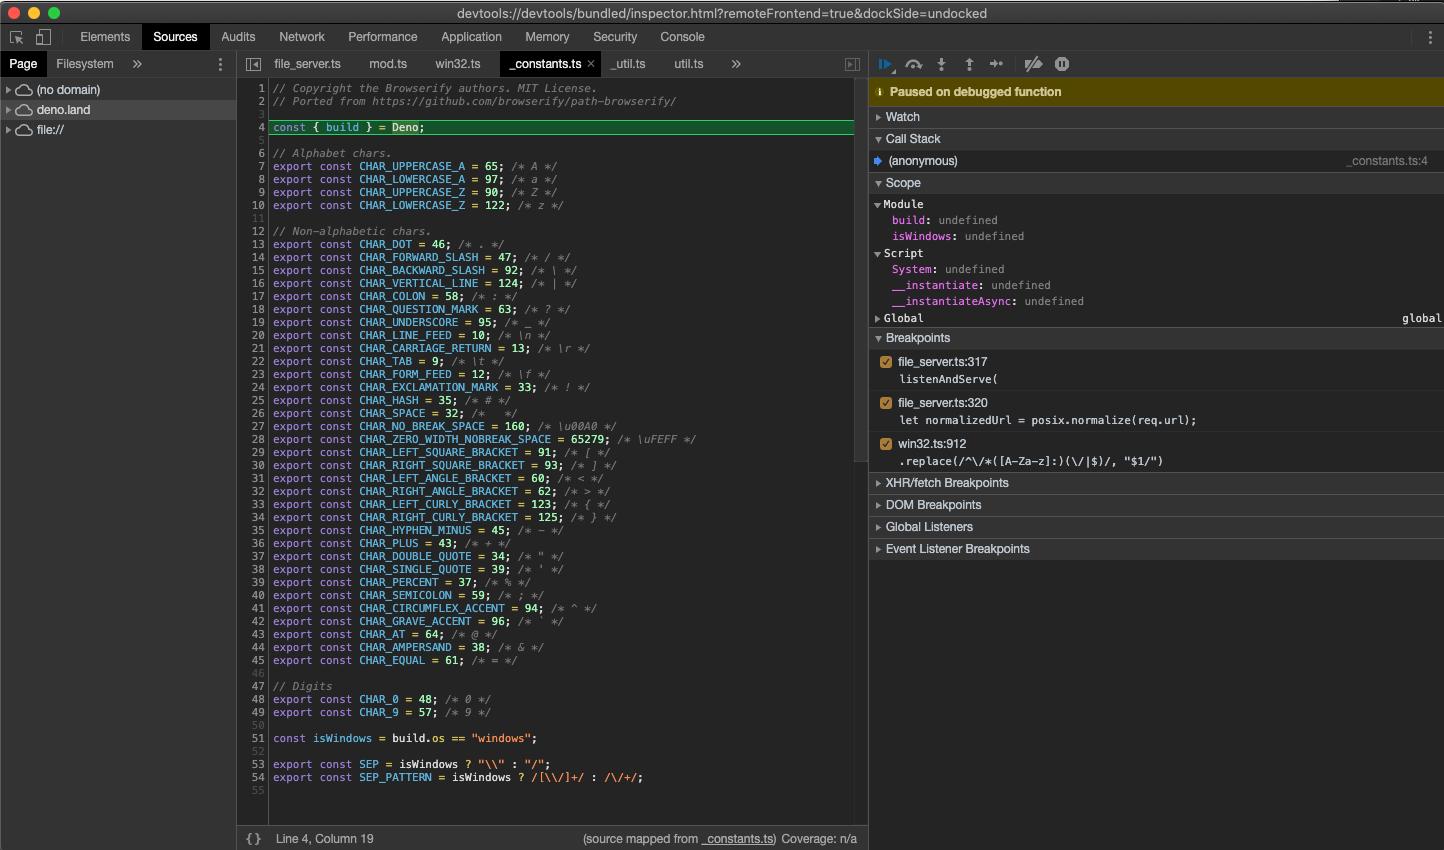
您可能注意到开发者工具暂停执行的地方不是 file_server.ts,而是 _constants.ts 的第一行。这是符合预期的行为,ES 模块在 V8 中执行的顺序如此。_constants.ts 是 file_server.ts 最深、最先的依赖,因此它会最先执行。
在这时,所有源码在开发者工具中都可用。打开 file_server.ts,加一处断点,然后打开 "Sources" 面板,展开树:
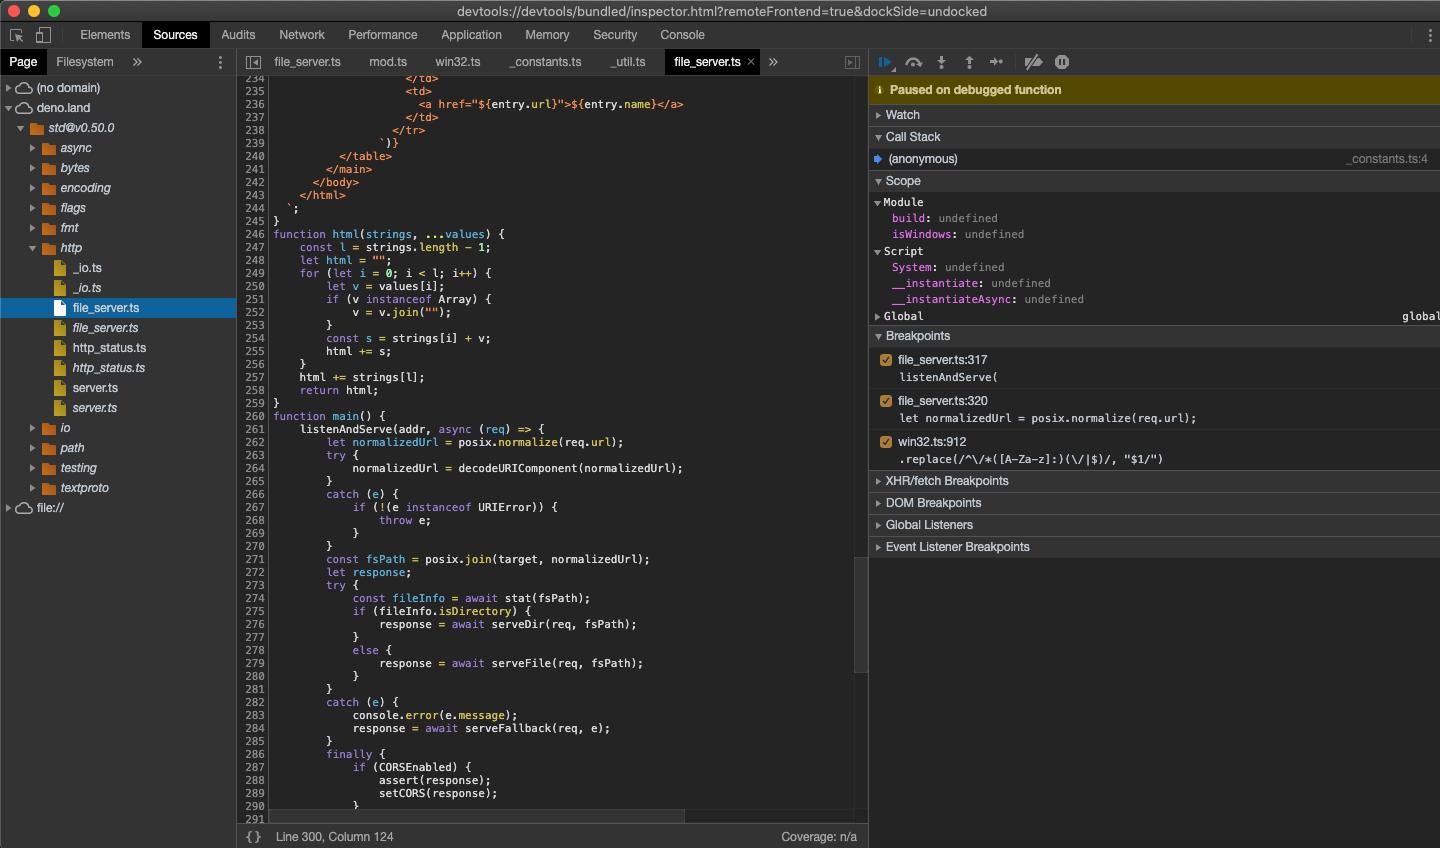
仔细观察,您会发现每个文件都有重复的条目,一个是正常字体,另一个是斜体。前者是编译后的源文件(所以 .ts 文件会生成 JavaScript 源代码),后者是该文件的源映射 (source map)。
下一步,在 listenAndServe 方法处加一个断点。
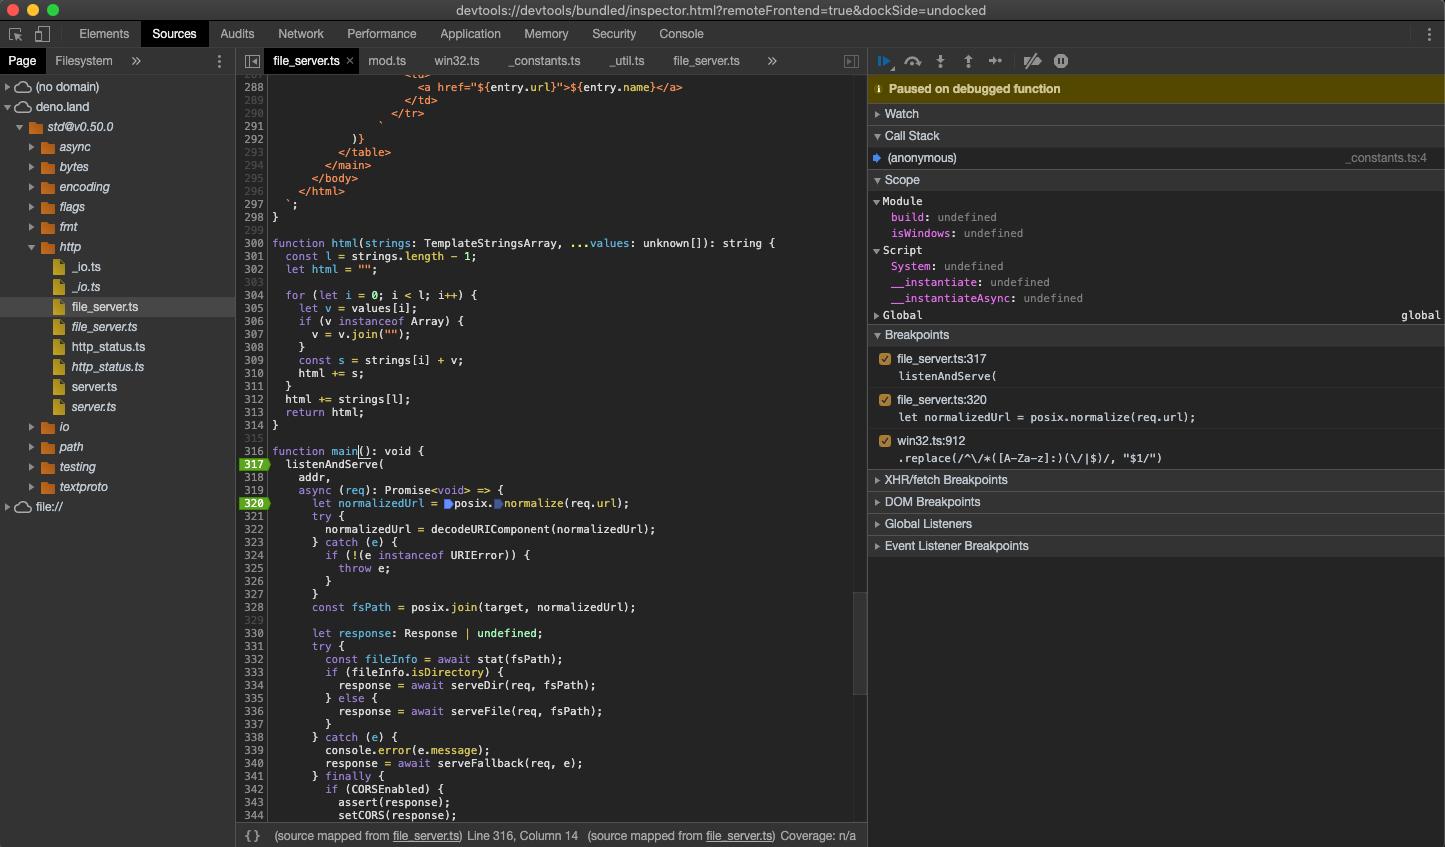
添加断点后,开发者工具会自动打开源映射文件,让我们能在包含类型的实际源码中步进。
现在我们已经设置了断点,在触发断点时,我们可以检查传入的请求,也可以继续执行脚本。点击恢复脚本执行的按钮即可,您可能需要点两次。
当脚本继续运行时,让我们发送一个请求,看看开发者工具中发生了什么。
$ curl http://0.0.0.0:4500/
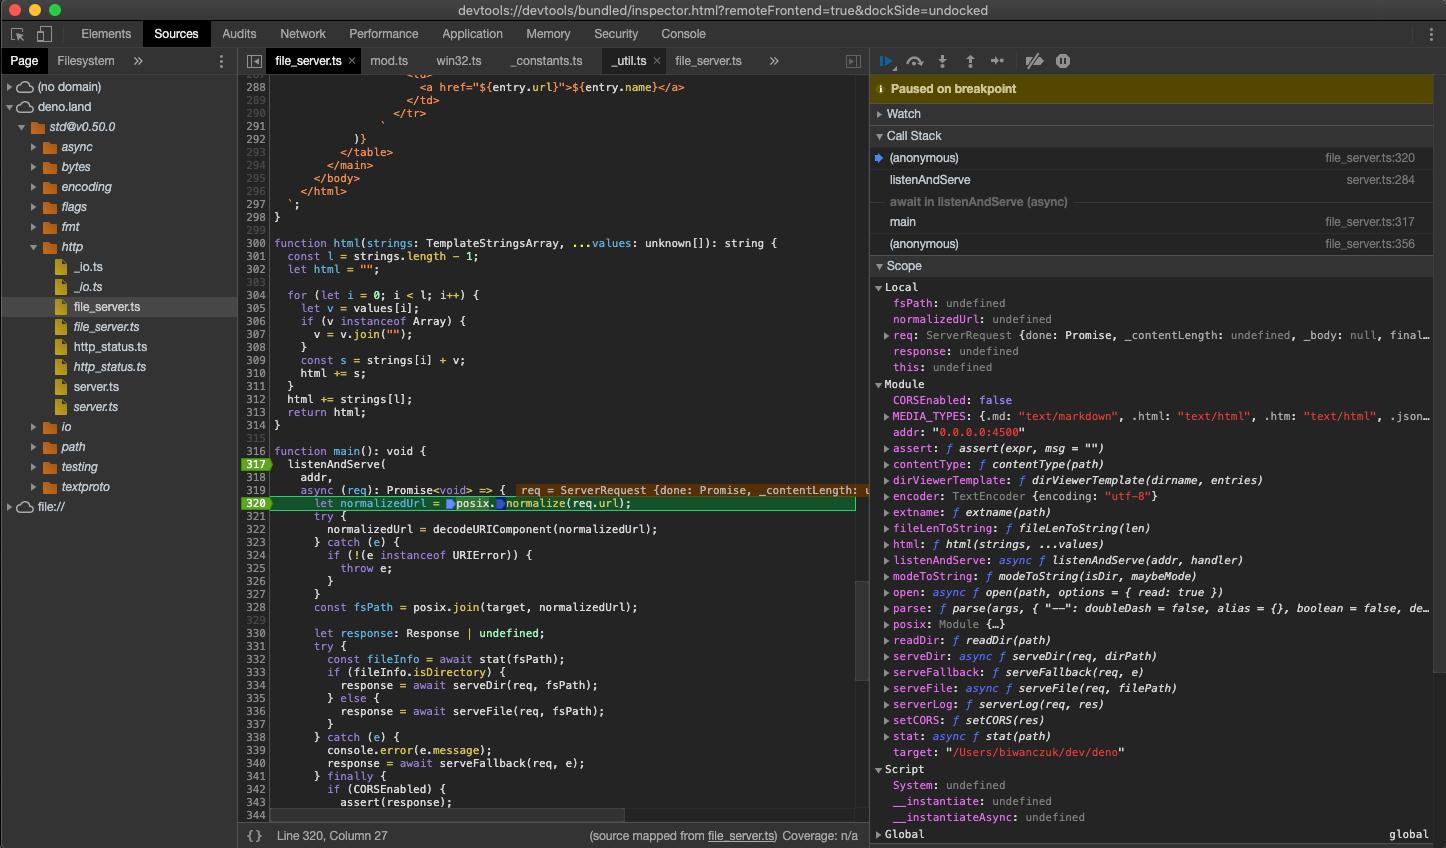
在这时,我们可以检查请求的内容,逐步调试代码。
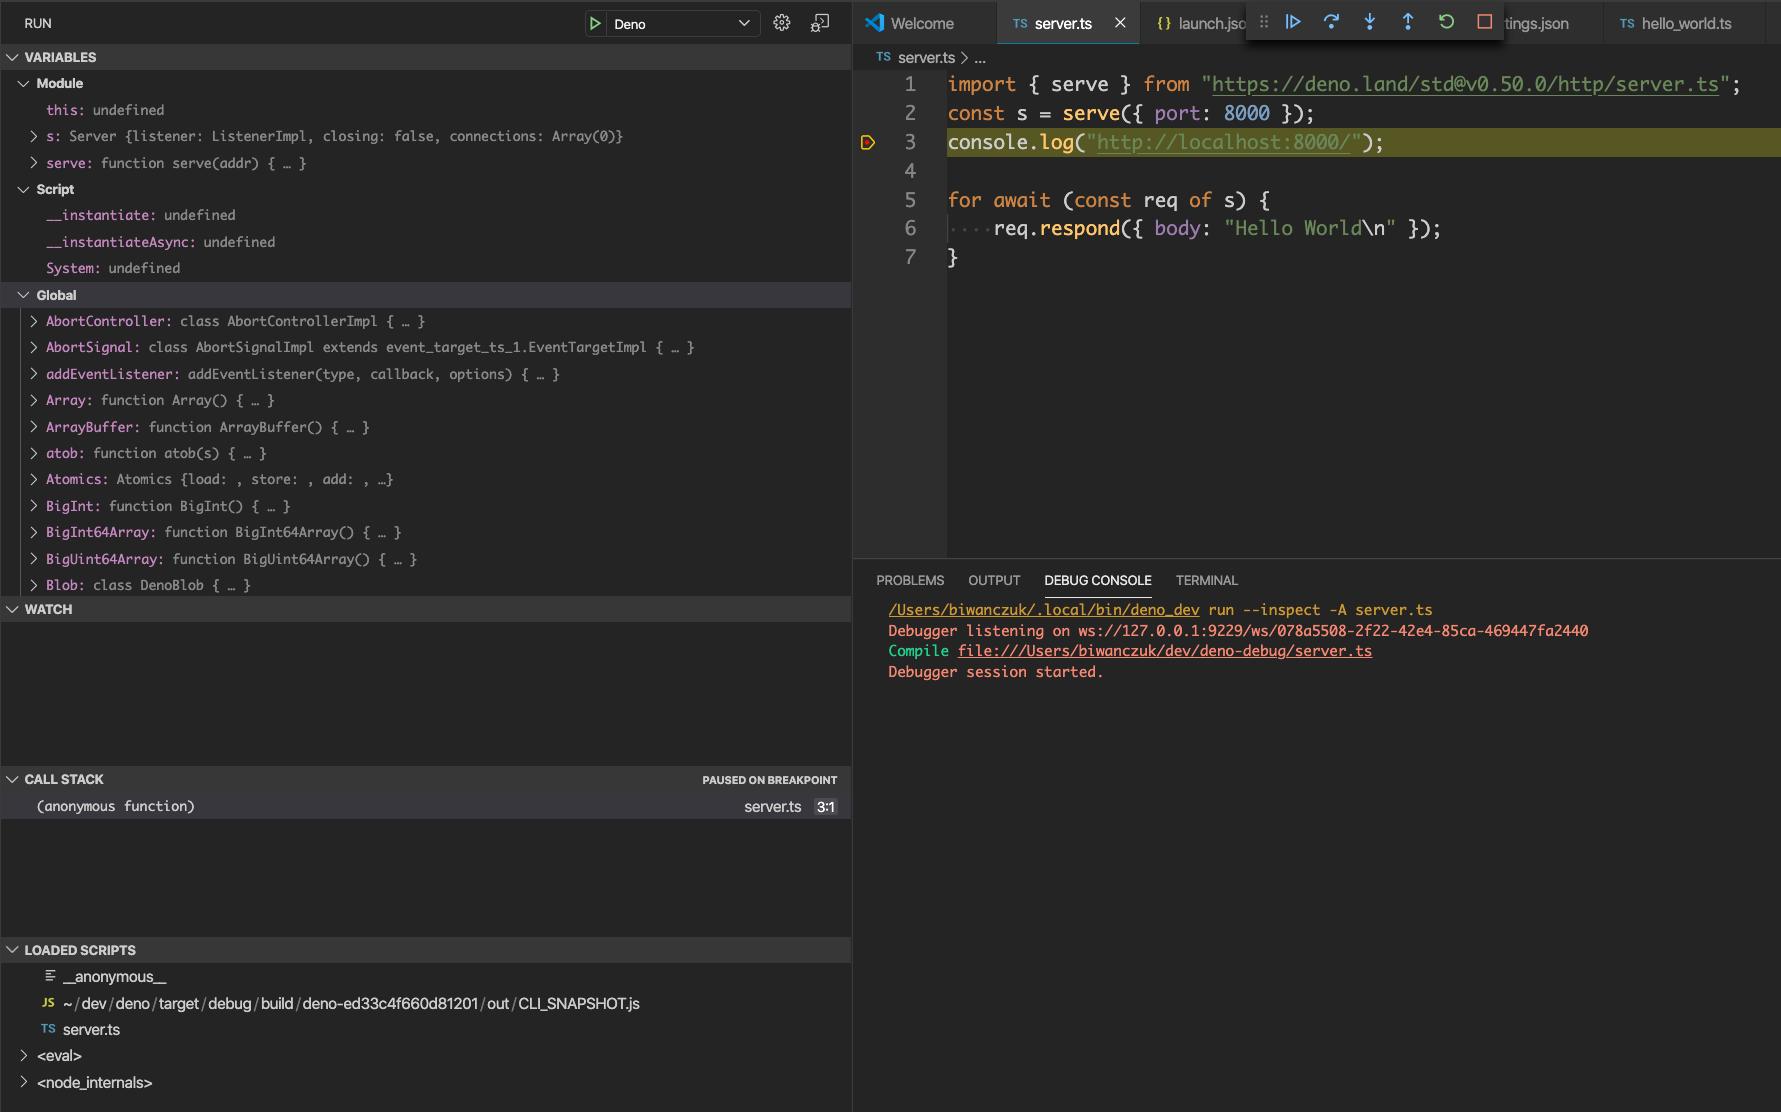
VSCode
Deno 可以在 VSCode 中调试。
插件的官方支持正在开发中 https://github.com/denoland/vscode_deno/issues/12
我们也可以通过手动提供 launch.json 配置,来连接调试器:
{
  "version": "0.2.0",
  "configurations": [
    {
      "name": "Deno",
      "type": "pwa-node",
      "request": "launch",
      "cwd": "${workspaceFolder}",
      "runtimeExecutable": "deno",
      "runtimeArgs": ["run", "--inspect-brk", "-A", "${file}"],
      "attachSimplePort": 9229
    }
  ]
}
注意:这将使用您打开的文件作为入口点;如果需要固定的入口点,请用脚本名称替换 ${file}。
让我们尝试一下本地源文件,创建 server.ts:
import { serve } from "https://deno.land/std@$STD_VERSION/http/server.ts";
const server = serve({ port: 8000 });
console.log("http://localhost:8000/");

for await (const req of server) {
  req.respond({ body: "Hello World\n" });
}
然后我们可以设置断点,运行已创建的配置:
JetBrains IDE
您可以使用 JetBrains IDE 来调试 Deno,右击您想要调试的文件,选择 Debug 'Deno: <file name>'。这会创建一个没有权限设置的 运行/调试 配置,您可能需要更改 Arguments 字段来提供所需权限。
其他
实现 Devtools 协议的任何客户端都能连接 Deno 进程。
限制
开发者工具的支持仍不成熟,有一些功能是缺失的,或是有 bug 的:
- 开发者工具控制台中的自动补全会让 Deno 进程退出。
- 性能分析 (profiling) 和内存转储 (memory dump) 可能不正确。
脚本安装器
Deno 提供 deno install 来安装和分发可执行代码。
deno install [OPTIONS...] [URL] [SCRIPT_ARGS...] 将把位于 URL 的脚本安装到名称 EXE_NAME 下。
这个命令将会创建一个轻薄的 shell 脚本来调用 deno,其中写入了特定的命令行参数。它位于 deno 安装目录的 bin 子目录下。
示例:
$ deno install --allow-net --allow-read https://deno.land/std@$STD_VERSION/http/file_server.ts
[1/1] Compiling https://deno.land/std@$STD_VERSION/http/file_server.ts

✅ Successfully installed file_server.
/Users/deno/.deno/bin/file_server
要改变命令名称,使用 -n/--name 参数:
deno install --allow-net --allow-read -n serve https://deno.land/std@$STD_VERSION/http/file_server.ts
默认情况下,Deno 会自动推导命令名称。
-
尝试获取文件名称 (file stem),以上示例将推导为 "file_server"
-
如果文件名称是通用的,比如 "main"、"mod"、"index" 或 "cli",并且它的路径没有父级,那么取父级路径的文件名,否则设置为原通用名称。
要改变安装路径,使用 --root 选项:
deno install --allow-net --allow-read --root /usr/local https://deno.land/std@$STD_VERSION/http/file_server.ts
按照优先顺序确定安装根目录:
--root选项DENO_INSTALL_ROOT环境变量$HOME/.deno
如果需要,它们必须被添加进 PATH 环境变量。
echo 'export PATH="$HOME/.deno/bin:$PATH"' >> ~/.bashrc
在安装时,您必须指定脚本会用到的权限。
deno install --allow-net --allow-read https://deno.land/std@$STD_VERSION/http/file_server.ts 8080
以上命令会创建一个名叫 file_server 的命令,运行时需要读取权限和网络权限,绑定到 8080 端口。
我们建议使用 import.meta.main 来指定作为可执行脚本时的入口点。
示例:
// https://example.com/awesome/cli.ts
async function myAwesomeCli(): Promise<void> {
  -- snip --
}

if (import.meta.main) {
  myAwesomeCli();
}
当您创建一个可执行脚本时,最好在仓库中告诉用户如何安装,让用户看到一个示例安装命令。
# 使用 deno install 安装

$ deno install -n awesome_cli https://example.com/awesome/cli.ts
代码格式化
Deno 有着内置的格式化工具,能够格式化 TypeScript 和 JavaScript 代码。
# 格式化当前目录和子目录下的所有 JS/TS 文件
deno fmt
# 格式化特定的文件
deno fmt myfile1.ts myfile2.ts
# 检查当前目录和子目录下的所有 JS/TS 文件是否都已被格式化
deno fmt --check
# 将标准输入流格式化并写入标准输出流
cat file.ts | deno fmt -
通过加上一句 // deno-fmt-ignore 注释来忽略格式化。
// deno-fmt-ignore
export const identity = [
    1, 0, 0,
    0, 1, 0,
    0, 0, 1,
];
在文件头部加上一句 // deno-fmt-ignore-file 注释可以忽略整个文件。
打包
deno bundle [URL] 将输出一个单独的 JavaScript 文件,其中包含了它的所有依赖。
示例:
> deno bundle https://deno.land/std@$STD_VERSION/examples/colors.ts colors.bundle.js
Bundling "colors.bundle.js"
Emitting bundle to "colors.bundle.js"
9.2 kB emitted.
如果您忽略了输出文件参数,打包文件将输出到 stdout。
这个打包文件能够像其他任何模块一样在 Deno 中运行。
deno run colors.bundle.js
打包文件是一个自包含 (self contained) 的 ES 模块,其中的任何导出仍然可用。
举个例子,如果主模块是这样的:
export { foo } from "./foo.js";

export const bar = "bar";
它可以像这样被导入:
import { foo, bar } from "./lib.bundle.js";
打包文件也可以在浏览器中被加载,它是一个自包含的 ES 模块,因此 type 属性 (attribute) 必须设置为 "module"。
示例:
<script type="module" src="website.bundle.js"></script>
除了直接加载,它也可以从其他模块导入。
<script type="module">
  import * as website from "website.bundle.js";
</script>
文档生成器
deno doc 将处理一个或一组源文件,为每个模块的导出成员打印出 JSDoc 文档。
目前只支持两种导出声明:
export <declaration>export ... from ...
例如,对于这样的一个文件 add.ts:
/**
 * Adds x and y.
 * @param {number} x
 * @param {number} y
 * @returns {number} Sum of x and y
 */
export function add(x: number, y: number): number {
  return x + y;
}
运行 Deno doc 命令,把该函数的 JSDoc 注释打印到 stdout:
deno doc add.ts
function add(x: number, y: number): number
  Adds x and y. @param {number} x @param {number} y @returns {number} Sum of x and y
使用 --json 选项,用 JSON 格式输出文档。该格式在 deno doc website 使用,用以生成模块文档。
依赖检查器
deno info [URL] 会列出 ES 模块和它的所有依赖。
deno info https://deno.land/std@0.52.0/http/file_server.ts
Download https://deno.land/std@0.52.0/http/file_server.ts
...
local: /Users/deno/Library/Caches/deno/deps/https/deno.land/5bd138988e9d20db1a436666628ffb3f7586934e0a2a9fe2a7b7bf4fb7f70b98
type: TypeScript
compiled: /Users/deno/Library/Caches/deno/gen/https/deno.land/std@0.52.0/http/file_server.ts.js
map: /Users/deno/Library/Caches/deno/gen/https/deno.land/std@0.52.0/http/file_server.ts.js.map
deps:
https://deno.land/std@0.52.0/http/file_server.ts
  ├─┬ https://deno.land/std@0.52.0/path/mod.ts
  │ ├─┬ https://deno.land/std@0.52.0/path/win32.ts
  │ │ ├── https://deno.land/std@0.52.0/path/_constants.ts
  │ │ ├─┬ https://deno.land/std@0.52.0/path/_util.ts
  │ │ │ └── https://deno.land/std@0.52.0/path/_constants.ts
  │ │ └─┬ https://deno.land/std@0.52.0/testing/asserts.ts
  │ │   ├── https://deno.land/std@0.52.0/fmt/colors.ts
  │ │   └── https://deno.land/std@0.52.0/testing/diff.ts
  │ ├─┬ https://deno.land/std@0.52.0/path/posix.ts
  │ │ ├── https://deno.land/std@0.52.0/path/_constants.ts
  │ │ └── https://deno.land/std@0.52.0/path/_util.ts
  │ ├─┬ https://deno.land/std@0.52.0/path/common.ts
  │ │ └── https://deno.land/std@0.52.0/path/separator.ts
  │ ├── https://deno.land/std@0.52.0/path/separator.ts
  │ ├── https://deno.land/std@0.52.0/path/interface.ts
  │ └─┬ https://deno.land/std@0.52.0/path/glob.ts
  │   ├── https://deno.land/std@0.52.0/path/separator.ts
  │   ├── https://deno.land/std@0.52.0/path/_globrex.ts
  │   ├── https://deno.land/std@0.52.0/path/mod.ts
  │   └── https://deno.land/std@0.52.0/testing/asserts.ts
  ├─┬ https://deno.land/std@0.52.0/http/server.ts
  │ ├── https://deno.land/std@0.52.0/encoding/utf8.ts
  │ ├─┬ https://deno.land/std@0.52.0/io/bufio.ts
  │ │ ├─┬ https://deno.land/std@0.52.0/io/util.ts
  │ │ │ ├── https://deno.land/std@0.52.0/path/mod.ts
  │ │ │ └── https://deno.land/std@0.52.0/encoding/utf8.ts
  │ │ └── https://deno.land/std@0.52.0/testing/asserts.ts
  │ ├── https://deno.land/std@0.52.0/testing/asserts.ts
  │ ├─┬ https://deno.land/std@0.52.0/async/mod.ts
  │ │ ├── https://deno.land/std@0.52.0/async/deferred.ts
  │ │ ├── https://deno.land/std@0.52.0/async/delay.ts
  │ │ └─┬ https://deno.land/std@0.52.0/async/mux_async_iterator.ts
  │ │   └── https://deno.land/std@0.52.0/async/deferred.ts
  │ └─┬ https://deno.land/std@0.52.0/http/_io.ts
  │   ├── https://deno.land/std@0.52.0/io/bufio.ts
  │   ├─┬ https://deno.land/std@0.52.0/textproto/mod.ts
  │   │ ├── https://deno.land/std@0.52.0/io/util.ts
  │   │ ├─┬ https://deno.land/std@0.52.0/bytes/mod.ts
  │   │ │ └── https://deno.land/std@0.52.0/io/util.ts
  │   │ └── https://deno.land/std@0.52.0/encoding/utf8.ts
  │   ├── https://deno.land/std@0.52.0/testing/asserts.ts
  │   ├── https://deno.land/std@0.52.0/encoding/utf8.ts
  │   ├── https://deno.land/std@0.52.0/http/server.ts
  │   └── https://deno.land/std@0.52.0/http/http_status.ts
  ├─┬ https://deno.land/std@0.52.0/flags/mod.ts
  │ └── https://deno.land/std@0.52.0/testing/asserts.ts
  └── https://deno.land/std@0.52.0/testing/asserts.ts
依赖检查器对本地或远程的任意 ES 模块都有效。
缓存位置
deno info 可以用来显示与缓存位置有关的信息:
deno info
DENO_DIR location: "/Users/deno/Library/Caches/deno"
Remote modules cache: "/Users/deno/Library/Caches/deno/deps"
TypeScript compiler cache: "/Users/deno/Library/Caches/deno/gen"
Linter
Deno 附带了 JavaScript 和 TypeScript 的内置 linter。
注意:linter 是一个新功能,仍然不稳定,因此需要 --unstable 选项
# 检查当前目录树内所有 JS/TS 文件
deno lint --unstable
# 检查特定文件
deno lint --unstable myfile1.ts myfile2.ts
可用规则
ban-ts-commentban-untagged-ignoreconstructor-superfor-directiongetter-returnno-array-constructorno-async-promise-executorno-case-declarationsno-class-assignno-compare-neg-zerono-cond-assignno-debuggerno-delete-varno-dupe-argsno-dupe-keysno-duplicate-caseno-empty-character-classno-empty-interfaceno-empty-patternno-emptyno-ex-assignno-explicit-anyno-func-assignno-misused-newno-namespaceno-new-symbolno-obj-callno-octalno-prototype-builtinsno-regex-spacesno-setter-returnno-this-aliasno-this-before-superno-unsafe-finallyno-unsafe-negationno-withprefer-as-constprefer-namespace-keywordrequire-yieldtriple-slash-referenceuse-isnanvalid-typeof
忽略指令
文件
要忽略整个文件,// deno-lint-ignore-file 指令应该置于文件顶部:
// deno-lint-ignore-file

function foo(): any {
  // ...
}
必须在第一个语句或声明之前放置忽略指令:
// Copyright 2020 the Deno authors. All rights reserved. MIT license.

/**
 * Some JS doc
 **/

// deno-lint-ignore-file

import { bar } from "./bar.js";

function foo(): any {
  // ...
}
诊断 (Diagnostics)
要忽略某些诊断,// deno-lint-ignore <codes ...> 指令应该置于违规行之前。必须指定要忽略的规则名称:
// deno-lint-ignore no-explicit-any
function foo(): any {
  // ...
}

// deno-lint-ignore no-explicit-any explicit-function-return-type
function bar(a: any) {
  // ...
}
为了与 ESLint 兼容,deno lint 也支持 // eslint-ignore-next-line 指令。像 // deno-lint-ignore 一样,这也需要指定忽略的规则名称:
// eslint-ignore-next-line no-empty
while (true) {}

// eslint-ignore-next-line @typescript-eslint/no-explicit-any
function bar(a: any) {
  // ...
}
嵌入式 Deno
Deno 由多个部分组成,其中之一是 deno_core。这是一个 rust
crate,可以用作 Rust 应用中的嵌入式 JavaScript 运行时。
Deno 建立在 deno_core 的基础上。
Deno crate 发布于 crates.io。
您可以通过 docs.rs 查阅其 API。
贡献
-
阅读 风格指南.
-
请不要让 性能测试 变糟。
-
在 社区聊天室 获取帮助。
-
如果您将要在某个 issue 下做些工作,在那之前请先在 issue 中提示一下。
-
请在论坛上保持专业。我们遵循 Rust 的行为准则 (Code of conduct)。有问题请向 ry 发邮件(ry@tinyclouds.org)。
开发
从源码构建的步骤在 这里
发起一个 Pull Request
在提交之前,请确认以下步骤:
- 存在一个相关 issue,并且 PR 文本中引用了它。
- 有覆盖这些变化的测试。
- 确保
cargo test通过。 - 使用
./tools/format.py格式化代码。 - 确保
./tools/lint.py通过。
third_party 的改动
deno_third_party 包含了大部分 Deno 依赖的外部代码,所以我们在任何时候都知道我们在运行什么。我们用一些手动操作和私有脚本来维护它,要做出改动,您可能需要联系 @ry 或 @piscisaureus。
增加 Ops
Ops 又称“绑定” (bindings)。
我们非常担心在添加新 API 时会出错。在向 Deno 添加 Op 时,应该研究其他平台上的对应接口。请列出如何在 Go、Node、Rust 和 Python 中完成此功能。
例如,参考 deno.rename() 是如何在
PR #671 中提出并添加的。
发布
以往发布的所做更改的总结在 这里。
API 文档
公开 API 的文档很重要,我们希望它与代码内联。这有助于确保代码和文档紧密结合在一起。
利用 JSDoc
所有通过 deno 模块以及 global/window 命名空间公开的 API 和类型都应该有 JSDoc 文档。该文档经过解析并可供 TypeScript 编译器使用,因此易于在下游提供。JSDoc 块就在它们应用的语句之前,并以 /** doc */ 表示。例如:
/** A simple JSDoc comment */
export const FOO = "foo";
更多信息位于 https://jsdoc.app/
从源码构建
以下是从源码构建 Deno 的操作步骤。如果您只是想使用 Deno,您可以下载一个预构建的可执行文件,参考 入门 章节。
克隆 Deno 仓库
Linux 或 Mac 系统:
Clone on Linux or Mac:
git clone --recurse-submodules https://github.com/denoland/deno.git
在 Windows 系统上有一些额外步骤:
-
打开“开发者模式”,否则符号链接将需要管理员权限。
-
确认您正在使用 git 2.19.2.windows.1 或更高版本。
-
在检出 (checkout) 前,设置
core.symlinks=true。git config --global core.symlinks true git clone --recurse-submodules https://github.com/denoland/deno.git
前置条件
您需要 安装 Rust。Deno 不支持每晚版本(nightly) 构建,请确定您获取的是最新的稳定版本(stable release)。
检查以下工具是否已经安装:
rustc -V
cargo -V
设置 rust 的编译目标和组件
rustup target add wasm32-unknown-unknown
rustup target add wasm32-wasi
构建 Deno
最简单的方式是使用预编译的 V8 :
cargo build -vv
如果您想要从源码构建 Deno 和 V8 :
V8_FROM_SOURCE=1 cargo build -vv
从源码构建 V8 时会有更多依赖:
Python 2. 确认您的 PATH 环境变量中有一个无后缀 (suffix-less) 的 python/python.exe,并且它指向 Python 2,而不是 Python3 (issue 464)。
Linux 用户:必须已经安装 glib-2.0 开发文件。(在 Ubuntu 上,运行 apt install libglib2.0-dev)
Mac 用户:必须已经安装 Command Line Tools。(XCode 已经包含了 CLT。运行 xcode-select --install 来在没有 XCode 的情况下安装它。)
Windows 用户:
-
安装 VS Community 2019,安装 "Desktop development with C++" 工具包,确认以下工具都已被选中和安装。
- Visual C++ tools for CMake
- Windows 10 SDK (10.0.17763.0)
- Testing tools core features - Build Tools
- Visual C++ ATL for x86 and x64
- Visual C++ MFC for x86 and x64
- C++/CLI support
- VC++ 2015.3 v14.00 (v140) toolset for desktop
- 启用 "Debugging Tools for Windows":
"Control Panel"
→ "Programs"
→ "Programs and Features"
→ 选择 "Windows Software Development Kit - Windows 10"
→ "Change"
→ "Change"
→ 检查 "Debugging Tools For Windows"
→ "Change"
→ "Finish"
或者使用 Debugging Tools for Windows,它会下载文件,您应该手动安装
X64 Debuggers And Tools-x64_en-us.msi。
有关构建 V8 的更多细节请查阅 rusty_v8's README
构建
使用 Cargo:
# 构建:
cargo build -vv

# 构建失败?确保您位于最新的 master 分支,然后再试一次。如果还不行,尝试清除上一次的结果:
cargo clean && cargo build -vv

# 运行:
./target/debug/deno run cli/tests/002_hello.ts
测试和工具
测试
测试 deno:
# 运行所有测试套件:
cargo test

# 只测试 cli/js/:
cargo test js_unit_tests
测试 std/:
cargo test std_tests
代码检查与格式化
检查
./tools/lint.py
格式化
./tools/format.py
性能分析
开始性能分析:
# 确认我们正在构建发布版 (release)。
# 构建 deno 和 V8 的 d8。
ninja -C target/release d8

# 使用 --prof 选项运行想要分析的程序。
./target/release/deno run tests/http_bench.ts --allow-net --v8-flags=--prof &

# 施加压力。
third_party/wrk/linux/wrk http://localhost:4500/
kill `pgrep deno`
V8 将在当前目录写入一个文件,像这样 isolate-0x7fad98242400-v8.log。查看这个文件:
D8_PATH=target/release/ ./third_party/v8/tools/linux-tick-processor
isolate-0x7fad98242400-v8.log > prof.log
# 在 macOS 上, 使用 ./third_party/v8/tools/mac-tick-processor
prof.log 将包含不用调用的 tick 分布。
用 Web UI 查看这个日志,先生成 JSON 文件:
D8_PATH=target/release/ ./third_party/v8/tools/linux-tick-processor
isolate-0x7fad98242400-v8.log --preprocess > prof.json
在您的浏览器中打开 third_party/v8/tools/profview/index.html,选择 prof.json 以查看分布图。
在性能分析时有用的 V8 选项:
- --prof
- --log-internal-timer-events
- --log-timer-events
- --track-gc
- --log-source-code
- --track-gc-object-stats
有关 d8 和性能分析的更多信息,请查阅以下链接:
使用 LLDB 调试
Debugging with LLDB
$ lldb -- target/debug/deno run tests/worker.js
> run
> bt
> up
> up
> l
调试 Rust 代码,可以用 rust-lldb。
$ rust-lldb -- ./target/debug/deno run --allow-net tests/http_bench.ts
# 在 macOS 上,您可能看到像这样的警告:
# `ImportError: cannot import name _remove_dead_weakref`
# 在这种情况下,设置 PATH 以使用系统 python,例如
# PATH=/System/Library/Frameworks/Python.framework/Versions/2.7/bin:$PATH
(lldb) command script import "/Users/kevinqian/.rustup/toolchains/1.36.0-x86_64-apple-darwin/lib/rustlib/etc/lldb_rust_formatters.py"
(lldb) type summary add --no-value --python-function lldb_rust_formatters.print_val -x ".*" --category Rust
(lldb) type category enable Rust
(lldb) target create "../deno/target/debug/deno"
Current executable set to '../deno/target/debug/deno' (x86_64).
(lldb) settings set -- target.run-args  "tests/http_bench.ts" "--allow-net"
(lldb) b op_start
(lldb) r
V8 选项
V8 有很多内部的命令行选项:
$ deno run --v8-flags=--help _
SSE3=1 SSSE3=1 SSE4_1=1 SSE4_2=1 SAHF=1 AVX=1 FMA3=1 BMI1=1 BMI2=1 LZCNT=1 POPCNT=1 ATOM=0
Synopsis:
shell [options] [--shell] [<file>...]
d8 [options] [-e <string>] [--shell] [[--module] <file>...]
-e execute a string in V8
--shell run an interactive JavaScript shell
--module execute a file as a JavaScript module
Note: the --module option is implicitly enabled for *.mjs files.
The following syntax for options is accepted (both '-' and '--' are ok):
--flag (bool flags only)
--no-flag (bool flags only)
--flag=value (non-bool flags only, no spaces around '=')
--flag value (non-bool flags only)
-- (captures all remaining args in JavaScript)
Options:
--use-strict (enforce strict mode)
type: bool default: false
--es-staging (enable test-worthy harmony features (for internal use only))
type: bool default: false
--harmony (enable all completed harmony features)
type: bool default: false
--harmony-shipping (enable all shipped harmony features)
type: bool default: true
--harmony-regexp-sequence (enable "RegExp Unicode sequence properties" (in progress))
type: bool default: false
--harmony-weak-refs-with-cleanup-some (enable "harmony weak references with FinalizationRegistry.prototype.cleanupSome" (in progress))
type: bool default: false
--harmony-regexp-match-indices (enable "harmony regexp match indices" (in progress))
type: bool default: false
--harmony-top-level-await (enable "harmony top level await")
type: bool default: false
--harmony-namespace-exports (enable "harmony namespace exports (export * as foo from 'bar')")
type: bool default: true
--harmony-sharedarraybuffer (enable "harmony sharedarraybuffer")
type: bool default: true
--harmony-import-meta (enable "harmony import.meta property")
type: bool default: true
--harmony-dynamic-import (enable "harmony dynamic import")
type: bool default: true
--harmony-promise-all-settled (enable "harmony Promise.allSettled")
type: bool default: true
--harmony-promise-any (enable "harmony Promise.any")
type: bool default: true
--harmony-private-methods (enable "harmony private methods in class literals")
type: bool default: true
--harmony-weak-refs (enable "harmony weak references")
type: bool default: true
--harmony-string-replaceall (enable "harmony String.prototype.replaceAll")
type: bool default: true
--harmony-logical-assignment (enable "harmony logical assignment")
type: bool default: true
--lite-mode (enables trade-off of performance for memory savings)
type: bool default: false
--future (Implies all staged features that we want to ship in the not-too-far future)
type: bool default: false
--assert-types (generate runtime type assertions to test the typer)
type: bool default: false
--allocation-site-pretenuring (pretenure with allocation sites)
type: bool default: true
--page-promotion (promote pages based on utilization)
type: bool default: true
--always-promote-young-mc (always promote young objects during mark-compact)
type: bool default: true
--page-promotion-threshold (min percentage of live bytes on a page to enable fast evacuation)
type: int default: 70
--trace-pretenuring (trace pretenuring decisions of HAllocate instructions)
type: bool default: false
--trace-pretenuring-statistics (trace allocation site pretenuring statistics)
type: bool default: false
--track-fields (track fields with only smi values)
type: bool default: true
--track-double-fields (track fields with double values)
type: bool default: true
--track-heap-object-fields (track fields with heap values)
type: bool default: true
--track-computed-fields (track computed boilerplate fields)
type: bool default: true
--track-field-types (track field types)
type: bool default: true
--trace-block-coverage (trace collected block coverage information)
type: bool default: false
--trace-protector-invalidation (trace protector cell invalidations)
type: bool default: false
--feedback-normalization (feed back normalization to constructors)
type: bool default: false
--enable-one-shot-optimization (Enable size optimizations for the code that will only be executed once)
type: bool default: false
--unbox-double-arrays (automatically unbox arrays of doubles)
type: bool default: true
--interrupt-budget (interrupt budget which should be used for the profiler counter)
type: int default: 147456
--jitless (Disable runtime allocation of executable memory.)
type: bool default: false
--use-ic (use inline caching)
type: bool default: true
--budget-for-feedback-vector-allocation (The budget in amount of bytecode executed by a function before we decide to allocate feedback vectors)
type: int default: 1024
--lazy-feedback-allocation (Allocate feedback vectors lazily)
type: bool default: true
--ignition-elide-noneffectful-bytecodes (elide bytecodes which won't have any external effect)
type: bool default: true
--ignition-reo (use ignition register equivalence optimizer)
type: bool default: true
--ignition-filter-expression-positions (filter expression positions before the bytecode pipeline)
type: bool default: true
--ignition-share-named-property-feedback (share feedback slots when loading the same named property from the same object)
type: bool default: true
--print-bytecode (print bytecode generated by ignition interpreter)
type: bool default: false
--enable-lazy-source-positions (skip generating source positions during initial compile but regenerate when actually required)
type: bool default: true
--stress-lazy-source-positions (collect lazy source positions immediately after lazy compile)
type: bool default: false
--print-bytecode-filter (filter for selecting which functions to print bytecode)
type: string default: *
--trace-ignition-codegen (trace the codegen of ignition interpreter bytecode handlers)
type: bool default: false
--trace-ignition-dispatches (traces the dispatches to bytecode handlers by the ignition interpreter)
type: bool default: false
--trace-ignition-dispatches-output-file (the file to which the bytecode handler dispatch table is written (by default, the table is not written to a file))
type: string default: nullptr
--fast-math (faster (but maybe less accurate) math functions)
type: bool default: true
--trace-track-allocation-sites (trace the tracking of allocation sites)
type: bool default: false
--trace-migration (trace object migration)
type: bool default: false
--trace-generalization (trace map generalization)
type: bool default: false
--turboprop (enable experimental turboprop mid-tier compiler.)
type: bool default: false
--concurrent-recompilation (optimizing hot functions asynchronously on a separate thread)
type: bool default: true
--trace-concurrent-recompilation (track concurrent recompilation)
type: bool default: false
--concurrent-recompilation-queue-length (the length of the concurrent compilation queue)
type: int default: 8
--concurrent-recompilation-delay (artificial compilation delay in ms)
type: int default: 0
--block-concurrent-recompilation (block queued jobs until released)
type: bool default: false
--concurrent-inlining (run optimizing compiler's inlining phase on a separate thread)
type: bool default: false
--max-serializer-nesting (maximum levels for nesting child serializers)
type: int default: 25
--trace-heap-broker-verbose (trace the heap broker verbosely (all reports))
type: bool default: false
--trace-heap-broker-memory (trace the heap broker memory (refs analysis and zone numbers))
type: bool default: false
--trace-heap-broker (trace the heap broker (reports on missing data only))
type: bool default: false
--stress-runs (number of stress runs)
type: int default: 0
--deopt-every-n-times (deoptimize every n times a deopt point is passed)
type: int default: 0
--print-deopt-stress (print number of possible deopt points)
type: bool default: false
--opt (use adaptive optimizations)
type: bool default: true
--turbo-sp-frame-access (use stack pointer-relative access to frame wherever possible)
type: bool default: false
--turbo-control-flow-aware-allocation (consider control flow while allocating registers)
type: bool default: true
--turbo-filter (optimization filter for TurboFan compiler)
type: string default: *
--trace-turbo (trace generated TurboFan IR)
type: bool default: false
--trace-turbo-path (directory to dump generated TurboFan IR to)
type: string default: nullptr
--trace-turbo-filter (filter for tracing turbofan compilation)
type: string default: *
--trace-turbo-graph (trace generated TurboFan graphs)
type: bool default: false
--trace-turbo-scheduled (trace TurboFan IR with schedule)
type: bool default: false
--trace-turbo-cfg-file (trace turbo cfg graph (for C1 visualizer) to a given file name)
type: string default: nullptr
--trace-turbo-types (trace TurboFan's types)
type: bool default: true
--trace-turbo-scheduler (trace TurboFan's scheduler)
type: bool default: false
--trace-turbo-reduction (trace TurboFan's various reducers)
type: bool default: false
--trace-turbo-trimming (trace TurboFan's graph trimmer)
type: bool default: false
--trace-turbo-jt (trace TurboFan's jump threading)
type: bool default: false
--trace-turbo-ceq (trace TurboFan's control equivalence)
type: bool default: false
--trace-turbo-loop (trace TurboFan's loop optimizations)
type: bool default: false
--trace-turbo-alloc (trace TurboFan's register allocator)
type: bool default: false
--trace-all-uses (trace all use positions)
type: bool default: false
--trace-representation (trace representation types)
type: bool default: false
--turbo-verify (verify TurboFan graphs at each phase)
type: bool default: false
--turbo-verify-machine-graph (verify TurboFan machine graph before instruction selection)
type: string default: nullptr
--trace-verify-csa (trace code stubs verification)
type: bool default: false
--csa-trap-on-node (trigger break point when a node with given id is created in given stub. The format is: StubName,NodeId)
type: string default: nullptr
--turbo-stats (print TurboFan statistics)
type: bool default: false
--turbo-stats-nvp (print TurboFan statistics in machine-readable format)
type: bool default: false
--turbo-stats-wasm (print TurboFan statistics of wasm compilations)
type: bool default: false
--turbo-splitting (split nodes during scheduling in TurboFan)
type: bool default: true
--function-context-specialization (enable function context specialization in TurboFan)
type: bool default: false
--turbo-inlining (enable inlining in TurboFan)
type: bool default: true
--max-inlined-bytecode-size (maximum size of bytecode for a single inlining)
type: int default: 500
--max-inlined-bytecode-size-cumulative (maximum cumulative size of bytecode considered for inlining)
type: int default: 1000
--max-inlined-bytecode-size-absolute (maximum cumulative size of bytecode considered for inlining)
type: int default: 5000
--reserve-inline-budget-scale-factor (maximum cumulative size of bytecode considered for inlining)
type: float default: 1.2
--max-inlined-bytecode-size-small (maximum size of bytecode considered for small function inlining)
type: int default: 30
--max-optimized-bytecode-size (maximum bytecode size to be considered for optimization; too high values may cause the compiler to hit (release) assertions)
type: int default: 61440
--min-inlining-frequency (minimum frequency for inlining)
type: float default: 0.15
--polymorphic-inlining (polymorphic inlining)
type: bool default: true
--stress-inline (set high thresholds for inlining to inline as much as possible)
type: bool default: false
--trace-turbo-inlining (trace TurboFan inlining)
type: bool default: false
--turbo-inline-array-builtins (inline array builtins in TurboFan code)
type: bool default: true
--use-osr (use on-stack replacement)
type: bool default: true
--trace-osr (trace on-stack replacement)
type: bool default: false
--analyze-environment-liveness (analyze liveness of environment slots and zap dead values)
type: bool default: true
--trace-environment-liveness (trace liveness of local variable slots)
type: bool default: false
--turbo-load-elimination (enable load elimination in TurboFan)
type: bool default: true
--trace-turbo-load-elimination (trace TurboFan load elimination)
type: bool default: false
--turbo-profiling (enable basic block profiling in TurboFan)
type: bool default: false
--turbo-profiling-verbose (enable basic block profiling in TurboFan, and include each function's schedule and disassembly in the output)
type: bool default: false
--turbo-verify-allocation (verify register allocation in TurboFan)
type: bool default: false
--turbo-move-optimization (optimize gap moves in TurboFan)
type: bool default: true
--turbo-jt (enable jump threading in TurboFan)
type: bool default: true
--turbo-loop-peeling (Turbofan loop peeling)
type: bool default: true
--turbo-loop-variable (Turbofan loop variable optimization)
type: bool default: true
--turbo-loop-rotation (Turbofan loop rotation)
type: bool default: true
--turbo-cf-optimization (optimize control flow in TurboFan)
type: bool default: true
--turbo-escape (enable escape analysis)
type: bool default: true
--turbo-allocation-folding (Turbofan allocation folding)
type: bool default: true
--turbo-instruction-scheduling (enable instruction scheduling in TurboFan)
type: bool default: false
--turbo-stress-instruction-scheduling (randomly schedule instructions to stress dependency tracking)
type: bool default: false
--turbo-store-elimination (enable store-store elimination in TurboFan)
type: bool default: true
--trace-store-elimination (trace store elimination)
type: bool default: false
--turbo-rewrite-far-jumps (rewrite far to near jumps (ia32,x64))
type: bool default: true
--stress-gc-during-compilation (simulate GC/compiler thread race related to https://crbug.com/v8/8520)
type: bool default: false
--turbo-fast-api-calls (enable fast API calls from TurboFan)
type: bool default: false
--reuse-opt-code-count (don't discard optimized code for the specified number of deopts.)
type: int default: 0
--turbo-nci (enable experimental native context independent code.)
type: bool default: false
--turbo-nci-as-highest-tier (replace default TF with NCI code as the highest tier for testing purposes.)
type: bool default: false
--print-nci-code (print native context independent code.)
type: bool default: false
--trace-turbo-nci (trace native context independent code.)
type: bool default: false
--turbo-collect-feedback-in-generic-lowering (enable experimental feedback collection in generic lowering.)
type: bool default: false
--optimize-for-size (Enables optimizations which favor memory size over execution speed)
type: bool default: false
--untrusted-code-mitigations (Enable mitigations for executing untrusted code)
type: bool default: false
--expose-wasm (expose wasm interface to JavaScript)
type: bool default: true
--assume-asmjs-origin (force wasm decoder to assume input is internal asm-wasm format)
type: bool default: false
--wasm-num-compilation-tasks (maximum number of parallel compilation tasks for wasm)
type: int default: 128
--wasm-write-protect-code-memory (write protect code memory on the wasm native heap)
type: bool default: false
--wasm-async-compilation (enable actual asynchronous compilation for WebAssembly.compile)
type: bool default: true
--wasm-test-streaming (use streaming compilation instead of async compilation for tests)
type: bool default: false
--wasm-max-mem-pages (maximum initial number of 64KiB memory pages of a wasm instance)
type: uint default: 32767
--wasm-max-mem-pages-growth (maximum number of 64KiB pages a Wasm memory can grow to)
type: uint default: 65536
--wasm-max-table-size (maximum table size of a wasm instance)
type: uint default: 10000000
--wasm-max-code-space (maximum committed code space for wasm (in MB))
type: uint default: 1024
--wasm-tier-up (enable tier up to the optimizing compiler (requires --liftoff to have an effect))
type: bool default: true
--trace-wasm-ast-start (start function for wasm AST trace (inclusive))
type: int default: 0
--trace-wasm-ast-end (end function for wasm AST trace (exclusive))
type: int default: 0
--liftoff (enable Liftoff, the baseline compiler for WebAssembly)
type: bool default: true
--trace-wasm-memory (print all memory updates performed in wasm code)
type: bool default: false
--wasm-tier-mask-for-testing (bitmask of functions to compile with TurboFan instead of Liftoff)
type: int default: 0
--wasm-expose-debug-eval (Expose wasm evaluator support on the CDP)
type: bool default: false
--validate-asm (validate asm.js modules before compiling)
type: bool default: true
--suppress-asm-messages (don't emit asm.js related messages (for golden file testing))
type: bool default: false
--trace-asm-time (log asm.js timing info to the console)
type: bool default: false
--trace-asm-scanner (log tokens encountered by asm.js scanner)
type: bool default: false
--trace-asm-parser (verbose logging of asm.js parse failures)
type: bool default: false
--stress-validate-asm (try to validate everything as asm.js)
type: bool default: false
--dump-wasm-module-path (directory to dump wasm modules to)
type: string default: nullptr
--experimental-wasm-eh (enable prototype exception handling opcodes for wasm)
type: bool default: false
--experimental-wasm-simd (enable prototype SIMD opcodes for wasm)
type: bool default: false
--experimental-wasm-return-call (enable prototype return call opcodes for wasm)
type: bool default: false
--experimental-wasm-compilation-hints (enable prototype compilation hints section for wasm)
type: bool default: false
--experimental-wasm-gc (enable prototype garbage collection for wasm)
type: bool default: false
--experimental-wasm-typed-funcref (enable prototype typed function references for wasm)
type: bool default: false
--experimental-wasm-reftypes (enable prototype reference type opcodes for wasm)
type: bool default: false
--experimental-wasm-threads (enable prototype thread opcodes for wasm)
type: bool default: false
--experimental-wasm-type-reflection (enable prototype wasm type reflection in JS for wasm)
type: bool default: false
--experimental-wasm-bigint (enable prototype JS BigInt support for wasm)
type: bool default: true
--experimental-wasm-bulk-memory (enable prototype bulk memory opcodes for wasm)
type: bool default: true
--experimental-wasm-mv (enable prototype multi-value support for wasm)
type: bool default: true
--wasm-staging (enable staged wasm features)
type: bool default: false
--wasm-opt (enable wasm optimization)
type: bool default: false
--wasm-bounds-checks (enable bounds checks (disable for performance testing only))
type: bool default: true
--wasm-stack-checks (enable stack checks (disable for performance testing only))
type: bool default: true
--wasm-math-intrinsics (intrinsify some Math imports into wasm)
type: bool default: true
--wasm-trap-handler (use signal handlers to catch out of bounds memory access in wasm (currently Linux x86_64 only))
type: bool default: true
--wasm-fuzzer-gen-test (generate a test case when running a wasm fuzzer)
type: bool default: false
--print-wasm-code (Print WebAssembly code)
type: bool default: false
--print-wasm-stub-code (Print WebAssembly stub code)
type: bool default: false
--asm-wasm-lazy-compilation (enable lazy compilation for asm-wasm modules)
type: bool default: false
--wasm-lazy-compilation (enable lazy compilation for all wasm modules)
type: bool default: false
--wasm-lazy-validation (enable lazy validation for lazily compiled wasm functions)
type: bool default: false
--wasm-atomics-on-non-shared-memory (allow atomic operations on non-shared WebAssembly memory)
type: bool default: true
--wasm-grow-shared-memory (allow growing shared WebAssembly memory objects)
type: bool default: true
--wasm-simd-post-mvp (allow experimental SIMD operations for prototyping that are not included in the current proposal)
type: bool default: false
--wasm-code-gc (enable garbage collection of wasm code)
type: bool default: true
--trace-wasm-code-gc (trace garbage collection of wasm code)
type: bool default: false
--stress-wasm-code-gc (stress test garbage collection of wasm code)
type: bool default: false
--wasm-max-initial-code-space-reservation (maximum size of the initial wasm code space reservation (in MB))
type: int default: 0
--frame-count (number of stack frames inspected by the profiler)
type: int default: 1
--stress-sampling-allocation-profiler (Enables sampling allocation profiler with X as a sample interval)
type: int default: 0
--lazy-new-space-shrinking (Enables the lazy new space shrinking strategy)
type: bool default: false
--min-semi-space-size (min size of a semi-space (in MBytes), the new space consists of two semi-spaces)
type: size_t default: 0
--max-semi-space-size (max size of a semi-space (in MBytes), the new space consists of two semi-spaces)
type: size_t default: 0
--semi-space-growth-factor (factor by which to grow the new space)
type: int default: 2
--max-old-space-size (max size of the old space (in Mbytes))
type: size_t default: 0
--max-heap-size (max size of the heap (in Mbytes) both max_semi_space_size and max_old_space_size take precedence. All three flags cannot be specified at the same time.)
type: size_t default: 0
--initial-heap-size (initial size of the heap (in Mbytes))
type: size_t default: 0
--huge-max-old-generation-size (Increase max size of the old space to 4 GB for x64 systems withthe physical memory bigger than 16 GB)
type: bool default: true
--initial-old-space-size (initial old space size (in Mbytes))
type: size_t default: 0
--global-gc-scheduling (enable GC scheduling based on global memory)
type: bool default: true
--gc-global (always perform global GCs)
type: bool default: false
--random-gc-interval (Collect garbage after random(0, X) allocations. It overrides gc_interval.)
type: int default: 0
--gc-interval (garbage collect after <n> allocations)
type: int default: -1
--retain-maps-for-n-gc (keeps maps alive for <n> old space garbage collections)
type: int default: 2
--trace-gc (print one trace line following each garbage collection)
type: bool default: false
--trace-gc-nvp (print one detailed trace line in name=value format after each garbage collection)
type: bool default: false
--trace-gc-ignore-scavenger (do not print trace line after scavenger collection)
type: bool default: false
--trace-idle-notification (print one trace line following each idle notification)
type: bool default: false
--trace-idle-notification-verbose (prints the heap state used by the idle notification)
type: bool default: false
--trace-gc-verbose (print more details following each garbage collection)
type: bool default: false
--trace-gc-freelists (prints details of each freelist before and after each major garbage collection)
type: bool default: false
--trace-gc-freelists-verbose (prints details of freelists of each page before and after each major garbage collection)
type: bool default: false
--trace-evacuation-candidates (Show statistics about the pages evacuation by the compaction)
type: bool default: false
--trace-allocations-origins (Show statistics about the origins of allocations. Combine with --no-inline-new to track allocations from generated code)
type: bool default: false
--trace-allocation-stack-interval (print stack trace after <n> free-list allocations)
type: int default: -1
--trace-duplicate-threshold-kb (print duplicate objects in the heap if their size is more than given threshold)
type: int default: 0
--trace-fragmentation (report fragmentation for old space)
type: bool default: false
--trace-fragmentation-verbose (report fragmentation for old space (detailed))
type: bool default: false
--minor-mc-trace-fragmentation (trace fragmentation after marking)
type: bool default: false
--trace-evacuation (report evacuation statistics)
type: bool default: false
--trace-mutator-utilization (print mutator utilization, allocation speed, gc speed)
type: bool default: false
--incremental-marking (use incremental marking)
type: bool default: true
--incremental-marking-wrappers (use incremental marking for marking wrappers)
type: bool default: true
--incremental-marking-task (use tasks for incremental marking)
type: bool default: true
--incremental-marking-soft-trigger (threshold for starting incremental marking via a task in percent of available space: limit - size)
type: int default: 0
--incremental-marking-hard-trigger (threshold for starting incremental marking immediately in percent of available space: limit - size)
type: int default: 0
--trace-unmapper (Trace the unmapping)
type: bool default: false
--parallel-scavenge (parallel scavenge)
type: bool default: true
--scavenge-task (schedule scavenge tasks)
type: bool default: true
--scavenge-task-trigger (scavenge task trigger in percent of the current heap limit)
type: int default: 80
--scavenge-separate-stack-scanning (use a separate phase for stack scanning in scavenge)
type: bool default: false
--trace-parallel-scavenge (trace parallel scavenge)
type: bool default: false
--write-protect-code-memory (write protect code memory)
type: bool default: true
--concurrent-marking (use concurrent marking)
type: bool default: true
--concurrent-array-buffer-sweeping (concurrently sweep array buffers)
type: bool default: true
--concurrent-allocation (concurrently allocate in old space)
type: bool default: false
--local-heaps (allow heap access from background tasks)
type: bool default: false
--stress-concurrent-allocation (start background threads that allocate memory)
type: bool default: false
--parallel-marking (use parallel marking in atomic pause)
type: bool default: true
--ephemeron-fixpoint-iterations (number of fixpoint iterations it takes to switch to linear ephemeron algorithm)
type: int default: 10
--trace-concurrent-marking (trace concurrent marking)
type: bool default: false
--concurrent-store-buffer (use concurrent store buffer processing)
type: bool default: true
--concurrent-sweeping (use concurrent sweeping)
type: bool default: true
--parallel-compaction (use parallel compaction)
type: bool default: true
--parallel-pointer-update (use parallel pointer update during compaction)
type: bool default: true
--detect-ineffective-gcs-near-heap-limit (trigger out-of-memory failure to avoid GC storm near heap limit)
type: bool default: true
--trace-incremental-marking (trace progress of the incremental marking)
type: bool default: false
--trace-stress-marking (trace stress marking progress)
type: bool default: false
--trace-stress-scavenge (trace stress scavenge progress)
type: bool default: false
--track-gc-object-stats (track object counts and memory usage)
type: bool default: false
--trace-gc-object-stats (trace object counts and memory usage)
type: bool default: false
--trace-zone-stats (trace zone memory usage)
type: bool default: false
--zone-stats-tolerance (report a tick only when allocated zone memory changes by this amount)
type: size_t default: 1048576
--track-retaining-path (enable support for tracking retaining path)
type: bool default: false
--concurrent-array-buffer-freeing (free array buffer allocations on a background thread)
type: bool default: true
--gc-stats (Used by tracing internally to enable gc statistics)
type: int default: 0
--track-detached-contexts (track native contexts that are expected to be garbage collected)
type: bool default: true
--trace-detached-contexts (trace native contexts that are expected to be garbage collected)
type: bool default: false
--move-object-start (enable moving of object starts)
type: bool default: true
--memory-reducer (use memory reducer)
type: bool default: true
--memory-reducer-for-small-heaps (use memory reducer for small heaps)
type: bool default: true
--heap-growing-percent (specifies heap growing factor as (1 + heap_growing_percent/100))
type: int default: 0
--v8-os-page-size (override OS page size (in KBytes))
type: int default: 0
--always-compact (Perform compaction on every full GC)
type: bool default: false
--never-compact (Never perform compaction on full GC - testing only)
type: bool default: false
--compact-code-space (Compact code space on full collections)
type: bool default: true
--flush-bytecode (flush of bytecode when it has not been executed recently)
type: bool default: true
--stress-flush-bytecode (stress bytecode flushing)
type: bool default: false
--use-marking-progress-bar (Use a progress bar to scan large objects in increments when incremental marking is active.)
type: bool default: true
--stress-per-context-marking-worklist (Use per-context worklist for marking)
type: bool default: false
--force-marking-deque-overflows (force overflows of marking deque by reducing it's size to 64 words)
type: bool default: false
--stress-compaction (stress the GC compactor to flush out bugs (implies --force_marking_deque_overflows))
type: bool default: false
--stress-compaction-random (Stress GC compaction by selecting random percent of pages as evacuation candidates. It overrides stress_compaction.)
type: bool default: false
--stress-incremental-marking (force incremental marking for small heaps and run it more often)
type: bool default: false
--fuzzer-gc-analysis (prints number of allocations and enables analysis mode for gc fuzz testing, e.g. --stress-marking, --stress-scavenge)
type: bool default: false
--stress-marking (force marking at random points between 0 and X (inclusive) percent of the regular marking start limit)
type: int default: 0
--stress-scavenge (force scavenge at random points between 0 and X (inclusive) percent of the new space capacity)
type: int default: 0
--gc-experiment-background-schedule (new background GC schedule heuristics)
type: bool default: false
--gc-experiment-less-compaction (less compaction in non-memory reducing mode)
type: bool default: false
--disable-abortjs (disables AbortJS runtime function)
type: bool default: false
--randomize-all-allocations (randomize virtual memory reservations by ignoring any hints passed when allocating pages)
type: bool default: false
--manual-evacuation-candidates-selection (Test mode only flag. It allows an unit test to select evacuation candidates pages (requires --stress_compaction).)
type: bool default: false
--fast-promotion-new-space (fast promote new space on high survival rates)
type: bool default: false
--clear-free-memory (initialize free memory with 0)
type: bool default: false
--young-generation-large-objects (allocates large objects by default in the young generation large object space)
type: bool default: true
--debug-code (generate extra code (assertions) for debugging)
type: bool default: false
--code-comments (emit comments in code disassembly; for more readable source positions you should add --no-concurrent_recompilation)
type: bool default: false
--enable-sse3 (enable use of SSE3 instructions if available)
type: bool default: true
--enable-ssse3 (enable use of SSSE3 instructions if available)
type: bool default: true
--enable-sse4-1 (enable use of SSE4.1 instructions if available)
type: bool default: true
--enable-sse4-2 (enable use of SSE4.2 instructions if available)
type: bool default: true
--enable-sahf (enable use of SAHF instruction if available (X64 only))
type: bool default: true
--enable-avx (enable use of AVX instructions if available)
type: bool default: true
--enable-fma3 (enable use of FMA3 instructions if available)
type: bool default: true
--enable-bmi1 (enable use of BMI1 instructions if available)
type: bool default: true
--enable-bmi2 (enable use of BMI2 instructions if available)
type: bool default: true
--enable-lzcnt (enable use of LZCNT instruction if available)
type: bool default: true
--enable-popcnt (enable use of POPCNT instruction if available)
type: bool default: true
--arm-arch (generate instructions for the selected ARM architecture if available: armv6, armv7, armv7+sudiv or armv8)
type: string default: armv8
--force-long-branches (force all emitted branches to be in long mode (MIPS/PPC only))
type: bool default: false
--mcpu (enable optimization for specific cpu)
type: string default: auto
--partial-constant-pool (enable use of partial constant pools (X64 only))
type: bool default: true
--sim-arm64-optional-features (enable optional features on the simulator for testing: none or all)
type: string default: none
--enable-source-at-csa-bind (Include source information in the binary at CSA bind locations.)
type: bool default: false
--enable-armv7 (deprecated (use --arm_arch instead))
type: maybe_bool default: unset
--enable-vfp3 (deprecated (use --arm_arch instead))
type: maybe_bool default: unset
--enable-32dregs (deprecated (use --arm_arch instead))
type: maybe_bool default: unset
--enable-neon (deprecated (use --arm_arch instead))
type: maybe_bool default: unset
--enable-sudiv (deprecated (use --arm_arch instead))
type: maybe_bool default: unset
--enable-armv8 (deprecated (use --arm_arch instead))
type: maybe_bool default: unset
--enable-regexp-unaligned-accesses (enable unaligned accesses for the regexp engine)
type: bool default: true
--script-streaming (enable parsing on background)
type: bool default: true
--stress-background-compile (stress test parsing on background)
type: bool default: false
--finalize-streaming-on-background (perform the script streaming finalization on the background thread)
type: bool default: false
--disable-old-api-accessors (Disable old-style API accessors whose setters trigger through the prototype chain)
type: bool default: false
--expose-gc (expose gc extension)
type: bool default: false
--expose-gc-as (expose gc extension under the specified name)
type: string default: nullptr
--expose-externalize-string (expose externalize string extension)
type: bool default: false
--expose-trigger-failure (expose trigger-failure extension)
type: bool default: false
--stack-trace-limit (number of stack frames to capture)
type: int default: 10
--builtins-in-stack-traces (show built-in functions in stack traces)
type: bool default: false
--experimental-stack-trace-frames (enable experimental frames (API/Builtins) and stack trace layout)
type: bool default: false
--disallow-code-generation-from-strings (disallow eval and friends)
type: bool default: false
--expose-async-hooks (expose async_hooks object)
type: bool default: false
--expose-cputracemark-as (expose cputracemark extension under the specified name)
type: string default: nullptr
--allow-unsafe-function-constructor (allow invoking the function constructor without security checks)
type: bool default: false
--force-slow-path (always take the slow path for builtins)
type: bool default: false
--test-small-max-function-context-stub-size (enable testing the function context size overflow path by making the maximum size smaller)
type: bool default: false
--inline-new (use fast inline allocation)
type: bool default: true
--trace (trace javascript function calls)
type: bool default: false
--trace-wasm (trace wasm function calls)
type: bool default: false
--lazy (use lazy compilation)
type: bool default: true
--max-lazy (ignore eager compilation hints)
type: bool default: false
--trace-opt (trace lazy optimization)
type: bool default: false
--trace-opt-verbose (extra verbose compilation tracing)
type: bool default: false
--trace-opt-stats (trace lazy optimization statistics)
type: bool default: false
--trace-deopt (trace optimize function deoptimization)
type: bool default: false
--trace-file-names (include file names in trace-opt/trace-deopt output)
type: bool default: false
--always-opt (always try to optimize functions)
type: bool default: false
--always-osr (always try to OSR functions)
type: bool default: false
--prepare-always-opt (prepare for turning on always opt)
type: bool default: false
--trace-serializer (print code serializer trace)
type: bool default: false
--compilation-cache (enable compilation cache)
type: bool default: true
--cache-prototype-transitions (cache prototype transitions)
type: bool default: true
--parallel-compile-tasks (enable parallel compile tasks)
type: bool default: false
--compiler-dispatcher (enable compiler dispatcher)
type: bool default: false
--trace-compiler-dispatcher (trace compiler dispatcher activity)
type: bool default: false
--cpu-profiler-sampling-interval (CPU profiler sampling interval in microseconds)
type: int default: 1000
--trace-side-effect-free-debug-evaluate (print debug messages for side-effect-free debug-evaluate for testing)
type: bool default: false
--hard-abort (abort by crashing)
type: bool default: true
--expose-inspector-scripts (expose injected-script-source.js for debugging)
type: bool default: false
--stack-size (default size of stack region v8 is allowed to use (in kBytes))
type: int default: 984
--max-stack-trace-source-length (maximum length of function source code printed in a stack trace.)
type: int default: 300
--clear-exceptions-on-js-entry (clear pending exceptions when entering JavaScript)
type: bool default: false
--histogram-interval (time interval in ms for aggregating memory histograms)
type: int default: 600000
--heap-profiler-trace-objects (Dump heap object allocations/movements/size_updates)
type: bool default: false
--heap-profiler-use-embedder-graph (Use the new EmbedderGraph API to get embedder nodes)
type: bool default: true
--heap-snapshot-string-limit (truncate strings to this length in the heap snapshot)
type: int default: 1024
--sampling-heap-profiler-suppress-randomness (Use constant sample intervals to eliminate test flakiness)
type: bool default: false
--use-idle-notification (Use idle notification to reduce memory footprint.)
type: bool default: true
--trace-ic (trace inline cache state transitions for tools/ic-processor)
type: bool default: false
--modify-field-representation-inplace (enable in-place field representation updates)
type: bool default: true
--max-polymorphic-map-count (maximum number of maps to track in POLYMORPHIC state)
type: int default: 4
--native-code-counters (generate extra code for manipulating stats counters)
type: bool default: false
--thin-strings (Enable ThinString support)
type: bool default: true
--trace-prototype-users (Trace updates to prototype user tracking)
type: bool default: false
--trace-for-in-enumerate (Trace for-in enumerate slow-paths)
type: bool default: false
--trace-maps (trace map creation)
type: bool default: false
--trace-maps-details (also log map details)
type: bool default: true
--allow-natives-syntax (allow natives syntax)
type: bool default: false
--allow-natives-for-differential-fuzzing (allow only natives explicitly allowlisted for differential fuzzers)
type: bool default: false
--parse-only (only parse the sources)
type: bool default: false
--trace-sim (Trace simulator execution)
type: bool default: false
--debug-sim (Enable debugging the simulator)
type: bool default: false
--check-icache (Check icache flushes in ARM and MIPS simulator)
type: bool default: false
--stop-sim-at (Simulator stop after x number of instructions)
type: int default: 0
--sim-stack-alignment (Stack alingment in bytes in simulator (4 or 8, 8 is default))
type: int default: 8
--sim-stack-size (Stack size of the ARM64, MIPS64 and PPC64 simulator in kBytes (default is 2 MB))
type: int default: 2048
--log-colour (When logging, try to use coloured output.)
type: bool default: true
--trace-sim-messages (Trace simulator debug messages. Implied by --trace-sim.)
type: bool default: false
--async-stack-traces (include async stack traces in Error.stack)
type: bool default: true
--stack-trace-on-illegal (print stack trace when an illegal exception is thrown)
type: bool default: false
--abort-on-uncaught-exception (abort program (dump core) when an uncaught exception is thrown)
type: bool default: false
--correctness-fuzzer-suppressions (Suppress certain unspecified behaviors to ease correctness fuzzing: Abort program when the stack overflows or a string exceeds maximum length (as opposed to throwing RangeError). Use a fixed suppression string for error messages.)
type: bool default: false
--randomize-hashes (randomize hashes to avoid predictable hash collisions (with snapshots this option cannot override the baked-in seed))
type: bool default: true
--rehash-snapshot (rehash strings from the snapshot to override the baked-in seed)
type: bool default: true
--hash-seed (Fixed seed to use to hash property keys (0 means random)(with snapshots this option cannot override the baked-in seed))
type: uint64 default: 0
--random-seed (Default seed for initializing random generator (0, the default, means to use system random).)
type: int default: 0
--fuzzer-random-seed (Default seed for initializing fuzzer random generator (0, the default, means to use v8's random number generator seed).)
type: int default: 0
--trace-rail (trace RAIL mode)
type: bool default: false
--print-all-exceptions (print exception object and stack trace on each thrown exception)
type: bool default: false
--detailed-error-stack-trace (includes arguments for each function call in the error stack frames array)
type: bool default: false
--adjust-os-scheduling-parameters (adjust OS specific scheduling params for the isolate)
type: bool default: true
--runtime-call-stats (report runtime call counts and times)
type: bool default: false
--rcs (report runtime call counts and times)
type: bool default: false
--rcs-cpu-time (report runtime times in cpu time (the default is wall time))
type: bool default: false
--profile-deserialization (Print the time it takes to deserialize the snapshot.)
type: bool default: false
--serialization-statistics (Collect statistics on serialized objects.)
type: bool default: false
--serialization-chunk-size (Custom size for serialization chunks)
type: uint default: 4096
--regexp-optimization (generate optimized regexp code)
type: bool default: true
--regexp-mode-modifiers (enable inline flags in regexp.)
type: bool default: false
--regexp-interpret-all (interpret all regexp code)
type: bool default: false
--regexp-tier-up (enable regexp interpreter and tier up to the compiler after the number of executions set by the tier up ticks flag)
type: bool default: true
--regexp-tier-up-ticks (set the number of executions for the regexp interpreter before tiering-up to the compiler)
type: int default: 1
--regexp-peephole-optimization (enable peephole optimization for regexp bytecode)
type: bool default: true
--trace-regexp-peephole-optimization (trace regexp bytecode peephole optimization)
type: bool default: false
--trace-regexp-bytecodes (trace regexp bytecode execution)
type: bool default: false
--trace-regexp-assembler (trace regexp macro assembler calls.)
type: bool default: false
--trace-regexp-parser (trace regexp parsing)
type: bool default: false
--trace-regexp-tier-up (trace regexp tiering up execution)
type: bool default: false
--testing-bool-flag (testing_bool_flag)
type: bool default: true
--testing-maybe-bool-flag (testing_maybe_bool_flag)
type: maybe_bool default: unset
--testing-int-flag (testing_int_flag)
type: int default: 13
--testing-float-flag (float-flag)
type: float default: 2.5
--testing-string-flag (string-flag)
type: string default: Hello, world!
--testing-prng-seed (Seed used for threading test randomness)
type: int default: 42
--testing-d8-test-runner (test runner turns on this flag to enable a check that the function was prepared for optimization before marking it for optimization)
type: bool default: false
--fuzzing (Fuzzers use this flag to signal that they are ... fuzzing. This causes intrinsics to fail silently (e.g. return undefined) on invalid usage.)
type: bool default: false
--embedded-src (Path for the generated embedded data file. (mksnapshot only))
type: string default: nullptr
--embedded-variant (Label to disambiguate symbols in embedded data file. (mksnapshot only))
type: string default: nullptr
--startup-src (Write V8 startup as C++ src. (mksnapshot only))
type: string default: nullptr
--startup-blob (Write V8 startup blob file. (mksnapshot only))
type: string default: nullptr
--target-arch (The mksnapshot target arch. (mksnapshot only))
type: string default: nullptr
--target-os (The mksnapshot target os. (mksnapshot only))
type: string default: nullptr
--target-is-simulator (Instruct mksnapshot that the target is meant to run in the simulator and it can generate simulator-specific instructions. (mksnapshot only))
type: bool default: false
--minor-mc-parallel-marking (use parallel marking for the young generation)
type: bool default: true
--trace-minor-mc-parallel-marking (trace parallel marking for the young generation)
type: bool default: false
--minor-mc (perform young generation mark compact GCs)
type: bool default: false
--help (Print usage message, including flags, on console)
type: bool default: true
--dump-counters (Dump counters on exit)
type: bool default: false
--dump-counters-nvp (Dump counters as name-value pairs on exit)
type: bool default: false
--use-external-strings (Use external strings for source code)
type: bool default: false
--map-counters (Map counters to a file)
type: string default:
--mock-arraybuffer-allocator (Use a mock ArrayBuffer allocator for testing.)
type: bool default: false
--mock-arraybuffer-allocator-limit (Memory limit for mock ArrayBuffer allocator used to simulate OOM for testing.)
type: size_t default: 0
--gdbjit (enable GDBJIT interface)
type: bool default: false
--gdbjit-full (enable GDBJIT interface for all code objects)
type: bool default: false
--gdbjit-dump (dump elf objects with debug info to disk)
type: bool default: false
--gdbjit-dump-filter (dump only objects containing this substring)
type: string default:
--log (Minimal logging (no API, code, GC, suspect, or handles samples).)
type: bool default: false
--log-all (Log all events to the log file.)
type: bool default: false
--log-api (Log API events to the log file.)
type: bool default: false
--log-code (Log code events to the log file without profiling.)
type: bool default: false
--log-handles (Log global handle events.)
type: bool default: false
--log-suspect (Log suspect operations.)
type: bool default: false
--log-source-code (Log source code.)
type: bool default: false
--log-function-events (Log function events (parse, compile, execute) separately.)
type: bool default: false
--prof (Log statistical profiling information (implies --log-code).)
type: bool default: false
--detailed-line-info (Always generate detailed line information for CPU profiling.)
type: bool default: false
--prof-sampling-interval (Interval for --prof samples (in microseconds).)
type: int default: 1000
--prof-cpp (Like --prof, but ignore generated code.)
type: bool default: false
--prof-browser-mode (Used with --prof, turns on browser-compatible mode for profiling.)
type: bool default: true
--logfile (Specify the name of the log file.)
type: string default: v8.log
--logfile-per-isolate (Separate log files for each isolate.)
type: bool default: true
--ll-prof (Enable low-level linux profiler.)
type: bool default: false
--gc-fake-mmap (Specify the name of the file for fake gc mmap used in ll_prof)
type: string default: /tmp/__v8_gc__
--log-internal-timer-events (Time internal events.)
type: bool default: false
--redirect-code-traces (output deopt information and disassembly into file code-<pid>-<isolate id>.asm)
type: bool default: false
--redirect-code-traces-to (output deopt information and disassembly into the given file)
type: string default: nullptr
--print-opt-source (print source code of optimized and inlined functions)
type: bool default: false
--vtune-prof-annotate-wasm (Used when v8_enable_vtunejit is enabled, load wasm source map and provide annotate support (experimental).)
type: bool default: false
--win64-unwinding-info (Enable unwinding info for Windows/x64)
type: bool default: true
--interpreted-frames-native-stack (Show interpreted frames on the native stack (useful for external profilers).)
type: bool default: false
--predictable (enable predictable mode)
type: bool default: false
--predictable-gc-schedule (Predictable garbage collection schedule. Fixes heap growing, idle, and memory reducing behavior.)
type: bool default: false
--single-threaded (disable the use of background tasks)
type: bool default: false
--single-threaded-gc (disable the use of background gc tasks)
type: bool default: false
特别有用的:
--async-stack-trace
持续的性能测试
参考我们的测试 https://deno.land/benchmarks
测试图表假设 https://github.com/denoland/benchmark_data/blob/gh-pages/data.json 有着 BenchmarkData[] 类型。以下是 BenchmarkData 的定义:
interface ExecTimeData {
  mean: number;
  stddev: number;
  user: number;
  system: number;
  min: number;
  max: number;
}

interface BenchmarkData {
  created_at: string;
  sha1: string;
  benchmark: {
    [key: string]: ExecTimeData;
  };
  binarySizeData: {
    [key: string]: number;
  };
  threadCountData: {
    [key: string]: number;
  };
  syscallCountData: {
    [key: string]: number;
  };
}
Deno 风格指南
版权标题
存储库中的大多数模块都应具有以下版权标题:
// Copyright 2018-2020 the Deno authors. All rights reserved. MIT license.
如果代码来源于其他地方,请确保文件拥有适当的版权拥有者。 我们只允许 MIT、BSD 和 Apache 许可代码。
在文件名中使用下划线,而不是破折号
例如: 将文件命名为 file_server.ts 而不是 file-server.ts。
为新特性添加测试
每个模块都应该包含或伴随着对其公共功能的测试。
TODO 注释
TODO 注释通常应该将一个 issue 或者作者的 github 用户名放在括号中。例如:
// TODO(ry): Add tests.
// TODO(#123): Support Windows.
// FIXME(#349): Sometimes panics.
不建议使用元编程(Meta-programming),包括代理(Proxy)的使用
即使要写更多的代码,也要力求明确。
在某些情况下,使用这些技术可能是有意义的,但是在绝大多数情况下,它们是没有意义的。
包含代码(Inclusive code)
请遵循有关包含代码的准则,网址为:
https://chromium.googlesource.com/chromium/src/+/master/styleguide/inclusive_code.md
Rust
遵循 Rust 约定,并与现有代码保持一致。
TypeScript
代码库的 TypeScript 部分包括内置的 cli/js 和标准库 std。
使用 TypeScript 而不是 JavaScript
使用术语“模块(module)”,而不是“库(library)”或“包(package)”
为了保证明确性和一致性,避免使用术语 “library” 和 “package” ,而是使用 “module” 来引用一个 JS 或 TS 文件,或者一个 TS/JS 代码目录。
不要使用 index.ts 或 index.js 作为文件名
Deno 不会以特殊的方式处理 “index.js” 或 “index.ts” 文件。如果使用了这些名称,就意味着当它们需要模块说明符时,可能被排除在外。这会造成误解。
如果一个代码目录需要一个默认的入口点,使用文件名 mod.ts。 文件名 mod.ts 遵循 Rust 的约定,比 index.ts 短,并且没有任何关于它如何工作的先入为主的概念。
导出函数(Exported functions): 最多 2 个参数,其余的放入一个选项对象(options object)
在设计函数接口时,请严格遵循以下规则:
-
若某函数是公共 API 的一部分,则其可以接受 0~2 个参数,如果必要的话,可以外加一个选项对象,因此最大总数为 3 个。
-
可选参数通常应放到选项对象中。
如果只有一个可选参数,并且将来一般不会添加更多可选参数,那么该可选参数可以不放在选项对象中。
-
选项参数是唯一一个常规对象参数
其他参数可以是对象,但它们在运行时必须能区别于其他一般的对象("plain" Object)。有以下两种方法进行区别:
- 一个独特的原型(例如:
Array,Map,Date,class MyThing) - 一个众所周知的符号属性(例如
Symbol.iterator)
这允许 API 以向后兼容的方式发展,即使选项对象的位置发生了变化。
- 一个独特的原型(例如:
// 错误示例:可选参数不是选项对象的一部分 (#2)
export function resolve(
  hostname: string,
  family?: "ipv4" | "ipv6",
  timeout?: number,
): IPAddress[] {}

// 正确示例:
export interface ResolveOptions {
  family?: "ipv4" | "ipv6";
  timeout?: number;
}
export function resolve(
  hostname: string,
  options: ResolveOptions = {},
): IPAddress[] {}
export interface Environment {
  [key: string]: string;
}

// 错误示例:`env`可以是一个常规对象,因此无法与选项对象区分 (#3)
export function runShellWithEnv(cmdline: string, env: Environment): string {}

// 正确示例
export interface RunShellOptions {
  env: Environment;
}
export function runShellWithEnv(
  cmdline: string,
  options: RunShellOptions,
): string {}
// 错误示例:多于3个参数 (#1),多个可选参数 (#2)。
export function renameSync(
  oldname: string,
  newname: string,
  replaceExisting?: boolean,
  followLinks?: boolean,
) {}

// 正确示例
interface RenameOptions {
  replaceExisting?: boolean;
  followLinks?: boolean;
}
export function renameSync(
  oldname: string,
  newname: string,
  options: RenameOptions = {},
) {}
// 错误示例:参数过多 (#1)
export function pwrite(
  fd: number,
  buffer: TypedArray,
  offset: number,
  length: number,
  position: number,
) {}

// 正确示例:
export interface PWrite {
  fd: number;
  buffer: TypedArray;
  offset: number;
  length: number;
  position: number;
}
export function pwrite(options: PWrite) {}
尽量降低依赖性;不要进行循环导入
尽管 cli/js 和 std 没有外部依赖关系,但仍然必须注意保持内部依赖关系的简单性和可管理性。请尤为注意,不要引入循环导入。
不要连接到文件名以下划线开头的文件,如:_foo.ts
有时候可能需要一个内部模块,但是它的 API 并不稳定或者不被连接。这种情况下,在文件名前面加一个下划线。按照惯例,只有它自己目录中的文件才能导入它。
对导出的符号使用 JSDoc
我们力求文档的完整性。理想情况下,每个导出的文档符号都应该有一个文档行。
如果可能的话,最好写单行 JSDoc。例如:
/** foo does bar. */
export function foo() {
  // ...
}
文档易于阅读是很重要的,但是还需要提供额外的样式信息,以确保生成的文档有更丰富的含义。因此,JSDoc 通常应该遵循 markdown 标记来丰富文本。
虽然 markdown 支持 HTML 标记,但是在 JSDoc 块中是禁止的。
代码字符串文字应使用反引号(`)括起来,而不是用引号。例如:
/** Import something from the `deno` module. */
不要记录函数参数,除非它们的意图不明显(当然,如果它们没有明显的意图,应该重新考虑 API 的设计)。因此,通常不应使用 @param。如果使用了 @param,则不应该包含 type ,因为 TypeScript 已经是强类型化的了。
/**
 * Function with non obvious param.
 * @param foo Description of non obvious parameter.
 */
应尽可能减小垂直间距。因此单行注释应写为:
/** 这样写单行 JSDoc 注释。 */
不要写为:
/**
 * 不要这样写单行 JSDoc 注释。
 */
代码示例不应使用三个反引号(```)标记。它们应该用缩进标记,要求在示例代码块前加入一个空行,并且示例代码的每一行需要有 6 个额外空格。比注释的第一列多 4 个空格。例如:
/** A straight forward comment and an example:
 *
 *       import { foo } from "deno";
 *       foo("bar");
 */
既然代码示例已经是一个注释了,它就不应再包含其他注释。如果它需要进一步的注释,那意味着它不是一个很好的示例。
每个模块都应该附带一个测试模块
每个带有公共功能 foo.ts 的模块都应该附带一个测试模块 foo_test.ts。由于 cli/js 模块的上下文不同,它的测试应该放在 cli/js/tests 中,或者它应只是测试模块的同级模块。
单元测试应是明确的
为了更好地理解测试,函数应该在测试命令中按照提示正确命名,如:
test myTestFunction ... ok
测试示例:
import { assertEquals } from "https://deno.land/std@$STD_VERSION/testing/asserts.ts";
import { foo } from "./mod.ts";

Deno.test("myTestFunction", function() {
  assertEquals(foo(), { bar: "bar" });
});
顶级函数不应使用箭头语法
顶级函数应使用 function 关键字。箭头语法应限于闭包。
错误示例:
export const foo = (): string => {
  return "bar";
};
正确示例:
export function foo(): string {
  return "bar";
}
std
不要依赖外部代码
https://deno.land/std/ 旨在成为所有 Deno 程序可以依赖的基础功能。我们希望向用户保证,此代码不包含任何可能未经审核的第三方代码。
文档以及维护浏览器兼容性
如果一个模块兼容浏览器,在模块顶部的 JSDoc 中包含以下声明:
/** This module is browser compatible. */
为该模块维护浏览器兼容性,在代码和测试中都不要使用 Deno 命名空间,确保任何新的依赖都兼容浏览器。
内部细节
Deno 和 Linux 类比
| Linux | Deno |
|---|---|
| 进程 (Processes) | Web Workers |
| 系统调用 (Syscalls) | Ops |
| 文件描述符 (fd) | Resource ids (rid) |
| 调度器 (Scheduler) | Tokio |
| 用户空间: libc++ / glib / boost | https://deno.land/std/ |
| /proc/$$/stat | Deno.metrics() |
| 手册页 (man pages) | deno types |
资源 (Resources)
资源(Resources),又称 rid,是 Deno 版本的文件描述符。它们是一些整数数值,用来指代打开的文件、套接字 (sockets) 和其他概念。基于 rid,Deno 能够查询系统中有多少个打开的资源,这在测试时很有用。
console.log(Deno.resources());
// { 0: "stdin", 1: "stdout", 2: "stderr" }
Deno.close(0);
console.log(Deno.resources());
// { 1: "stdout", 2: "stderr" }
指标 (Metrics)
指标 (Metrics) 是 Deno 用于各种统计数据的内部计数器。
> console.table(Deno.metrics())
┌──────────────────┬────────┐
│     (index)      │ Values │
├──────────────────┼────────┤
│  opsDispatched   │   9    │
│   opsCompleted   │   9    │
│ bytesSentControl │  504   │
│  bytesSentData   │   0    │
│  bytesReceived   │  856   │
└──────────────────┴────────┘
架构示意图
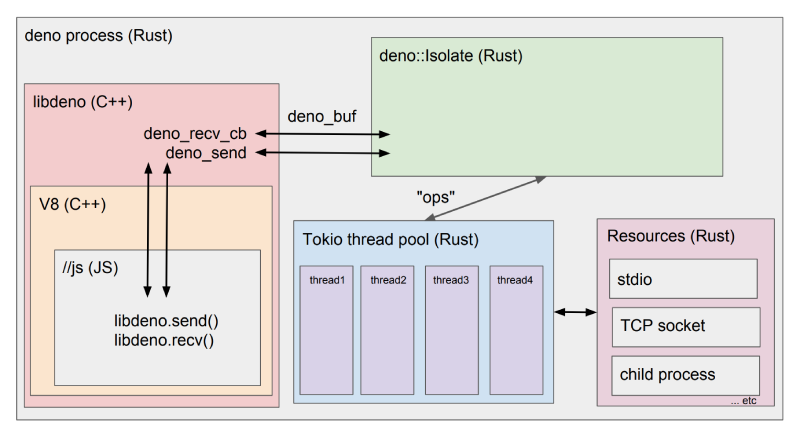
会议
Ryan Dahl - An interesting case with Deno
示例
在本章节,您可以找到一些示例程序,用来学习 Deno。
Basic
Advanced
Hello World
Deno 是 JavaScript 和 TypeScript 的安全运行时。 以下 hello world 示例展示了 JavaScript 和 TypeScript 具有相同的能力,两者都可以被 Deno 执行。
JavaScript
在这个 JavaScript 示例中,消息 Hello [name] 被打印到控制台,代码会保证名字的首字母是大写的。
命令: deno run hello-world.js
function capitalize(word) {
  return word.charAt(0).toUpperCase() + word.slice(1);
}

function hello(name) {
  return "Hello " + capitalize(name);
}

console.log(hello("john"));
console.log(hello("Sarah"));
console.log(hello("kai"));

/**
 * 输出:
 *
 * Hello John
 * Hello Sarah
 * Hello Kai
**/
TypeScript
这个 TypeScript 示例和上面的 JavaScript 示例完全相同,这段代码包含了 TypeScript 支持的额外类型信息。
deno run 命令也完全相同,只把 *.js 改为 *.ts。
命令: deno run hello-world.ts
function capitalize(word: string): string {
  return word.charAt(0).toUpperCase() + word.slice(1);
}

function hello(name: string): string {
  return "Hello " + capitalize(name);
}

console.log(hello("john"));
console.log(hello("Sarah"));
console.log(hello("kai"));

/**
 * 输出:
 *
 * Hello John
 * Hello Sarah
 * Hello Kai
**/
导入和导出模块
默认情况下,Deno标准化了在 JavaScript 和 TypeScript 中导入模块的方式。
它遵循 ECMAScript 6 import/export 标准,但有一个警告,文件类型(后缀名)必须包含在 import 语句的末尾。
import {
  add,
  multiply,
} from "./arithmetic.ts";
依赖项也直接导入,没有包管理开销。本地模块的导入方式与远程模块完全相同。
如下面的示例所示,可以使用本地或远程模块以相同的方式产生相同的功能。
本地导入
在这个例子中,add 和 multiply 函数是从本地的 arithmetic.ts 模块导入的。
命令: deno run local.ts
import { add, multiply } from "./arithmetic.ts";

function totalCost(outbound: number, inbound: number, tax: number): number {
  return multiply(add(outbound, inbound), tax);
}

console.log(totalCost(19, 31, 1.2));
console.log(totalCost(45, 27, 1.15));

/**
 * 输出:
 *
 * 60
 * 82.8
 */
导出
在上面的示例中,add 和 multiply 函数是从本地存储的算术模块导入的。为此,必须导出存储在运算模块中的功能。
只需将关键字 export 添加到函数签名的开头,如下所示。
export function add(a: number, b: number): number {
  return a + b;
}

export function multiply(a: number, b: number): number {
  return a * b;
}
需要在外部模块中访问的所有函数、类、常量和变量都必须导出。可以在它们的前面加上 export 关键字,也可以将它们包括在文件底部的 export 语句中。
要了解有关 ECMAScript 导出功能的更多信息,请阅读 MDN 文档.
远程导入
在上面的本地导入示例中,从本地存储的算术模块中导入了 add 和 multiply 方法。 也可以通过从远程模块导入 add 和 multiply 方法来实现相同的功能。
在这种情况下,可以导入 Ramda 模块,包括版本号。Deno 可以处理 JavaScript 模块直接导入到 TypeSript 模块的情况。
命令: deno run ./remote.ts
import {
  add,
  multiply,
} from "https://x.nest.land/ramda@0.27.0/source/index.js";

function totalCost(outbound: number, inbound: number, tax: number): number {
  return multiply(add(outbound, inbound), tax);
}

console.log(totalCost(19, 31, 1.2));
console.log(totalCost(45, 27, 1.15));

/**
 * 输出:
 *
 * 60
 * 82.8
 */
管理依赖
在Deno中,没有包管理器的概念,因为外部模块直接导入到本地模块中。
这就提出了一个问题,即如何在没有包管理器的情况下管理远程依赖关系。在具有许多依赖性的大型项目中,如果将模块全部单独导入到单个模块中,则更新模块将变得很麻烦且耗时。
在 Deno 中解决此问题的标准做法是创建一个 deps.ts 文件。此文件中引用了所有必需的远程依赖关系,并且重新导出了所需的方法和类。本地模块从 deps.ts 导入所需方法和类,而不是远程依赖。
这样就可以轻松跨大型代码库更新模块,并解决“程序包管理器问题”(如果它存在的话)。开发依赖项也可以在单独的 dev_deps.ts 文件中进行管理。
deps.ts 示例
/**
 * deps.ts 从远程的 Ramda 模块中重新导出所需方法。
 **/
export {
  add,
  multiply,
} from "https://x.nest.land/ramda@0.27.0/source/index.js";
此示例中的功能与 导入和导出模块 相同。但是在这种情况下,不是直接导入 Ramda 模块,而是从本地代理 deps.ts 模块中导入。
命令: deno run dependencies.ts
import {
  add,
  multiply,
} from "./deps.ts";

function totalCost(outbound: number, inbound: number, tax: number): number {
  return multiply(add(outbound, inbound), tax);
}

console.log(totalCost(19, 31, 1.2));
console.log(totalCost(45, 27, 1.15));

/**
 * 输出:
 *
 * 60
 * 82.8
 */
Unix cat
在这个程序中,每个命令行参数都是一个文件名,参数对应的文件将被依次打开,打印到标准输出流。
const filenames = Deno.args;
for (const filename of filenames) {
  const file = await Deno.open(filename);
  await Deno.copy(file, Deno.stdout);
  file.close();
}
除了内核到用户空间再到内核的必要拷贝,这里的 copy() 函数不会产生额外的昂贵操作,从文件中读到的数据会原样写入标准输出流。这反映了 Deno I/O 流的通用设计目标。
尝试一下:
deno run --allow-read https://deno.land/std@$STD_VERSION/examples/cat.ts /etc/passwd
文件服务器
这个示例将会启动一个本地目录的 HTTP 服务器。
安装
deno install --allow-net --allow-read https://deno.land/std@$STD_VERSION/http/file_server.ts
运行
$ file_server .
Downloading https://deno.land/std@$STD_VERSION/http/file_server.ts...
[...]
HTTP server listening on http://0.0.0.0:4500/
如果想要升级到最新版本:
file_server --reload
TCP echo
这个示例是一个 TCP echo 服务,接收 8080 端口的连接,把接收到的任何数据返回给客户端。
const listener = Deno.listen({ port: 8080 });
console.log("listening on 0.0.0.0:8080");
for await (const conn of listener) {
  Deno.copy(conn, conn);
}
当这个程序启动时,它会抛出一个没有网络权限的错误。
$ deno run https://deno.land/std@$STD_VERSION/examples/echo_server.ts
error: Uncaught PermissionDenied: network access to "0.0.0.0:8080", run again with the --allow-net flag
► $deno$/dispatch_json.ts:40:11
    at DenoError ($deno$/errors.ts:20:5)
    ...
为了安全,Deno 不允许程序访问网络,除非显式赋予权限。使用一个命令行选项来允许程序访问网络:
deno run --allow-net https://deno.land/std@$STD_VERSION/examples/echo_server.ts
尝试用 netcat 向它发送数据。
$ nc localhost 8080
hello world
hello world
像示例 cat.ts 一样,copy() 函数不会产生不必要的内存拷贝。它从内核接收数据包,然后发送回去,就这么简单。
运行子进程
示例:
// 创建子进程
const p = Deno.run({
  cmd: ["echo", "hello"],
});

// 等待完成
await p.status();
运行
$ deno run --allow-run ./subprocess_simple.ts
hello
window.onload 被赋值为一个函数,它将会在主脚本加载后被调用,和浏览器的 onload 一样,可以用于主入口点。
默认情况下,当您调用 Deno.run() 时,子进程将继承父进程的标准流。如果您想要和子进程通信,可以使用 "piped" 选项。
const fileNames = Deno.args;

const p = Deno.run({
  cmd: [
    "deno",
    "run",
    "--allow-read",
    "https://deno.land/std@$STD_VERSION/examples/cat.ts",
    ...fileNames,
  ],
  stdout: "piped",
  stderr: "piped",
});

const { code } = await p.status();

if (code === 0) {
  const rawOutput = await p.output();
  await Deno.stdout.write(rawOutput);
} else {
  const rawError = await p.stderrOutput();
  const errorString = new TextDecoder().decode(rawError);
  console.log(errorString);
}

Deno.exit(code);
运行
$ deno run --allow-run ./subprocess.ts <somefile>
[file content]

$ deno run --allow-run ./subprocess.ts non_existent_file.md

Uncaught NotFound: No such file or directory (os error 2)
    at DenoError (deno/js/errors.ts:22:5)
    at maybeError (deno/js/errors.ts:41:12)
    at handleAsyncMsgFromRust (deno/js/dispatch.ts:27:17)
处理系统信号
这个程序使用了不稳定的 Deno 特性。更多信息请查阅 稳定性
您可以使用 Deno.signal() 函数来处理系统信号:
for await (const _ of Deno.signal(Deno.Signal.SIGINT)) {
  console.log("interrupted!");
}
Deno.signal() 也是一个 promise:
await Deno.signal(Deno.Signal.SIGINT);
console.log("interrupted!");
如果您想要停止监控信号,可以使用信号对象的 dispose() 方法:
const sig = Deno.signal(Deno.Signal.SIGINT);
setTimeout(() => {
  sig.dispose();
}, 5000);

for await (const _ of sig) {
  console.log("interrupted");
}
以上 for-await 循环将在 sig.dispose() 被调用时退出,运行时间为 5 秒。
文件系统事件
轮询文件系统事件:
const watcher = Deno.watchFs("/");
for await (const event of watcher) {
  console.log(">>>> event", event);
  // { kind: "create", paths: [ "/foo.txt" ] }
}
请注意,事件的确切顺序可能因操作系统而异。
此功能根据平台使用不同的系统调用:
- Linux: inotify
- macOS: FSEvents
- Windows: ReadDirectoryChangesW
测试当前文件是否为主程序
当前脚本作为主程序的标志是 import.meta.main。
if (import.meta.main) {
  console.log("main");
}